1 - Ubuntu: Measuring Agent manual install
Ubuntu: Measuring Agent Install Instructions
Prerequisites
Supported Hardware
- Amazon EC2 Cloud instances, or
- Own hosted Servers with any Intel or AMD CPU, or
- Own hosted Raspberry Pi 4 Model B / 8 GB (ARM CPU) / Ubuntu 20 only / for weak load tests up to max. 100 concurrent users (with loop iteration delay = 1000 ms)
Minimum Requirements
- Minimum required CPU Cores of Processor: 4
- Minimum required Memory: 8 GB
- Minimum required Disk: 64 GB
- Minimum required Network Speed: 100 Mbps (1000 Mbps or faster strongly recommended)
Usual Requirements
- Suggested Hardware for performing load tests up to 500 concurrent users: Intel CPU i3 / 16 GB Memory / Disk: 256 GB
- Suggested Hardware for performing load tests up to 1000 concurrent users: Intel CPU i5 / 16 GB Memory / Disk: 512 GB
- Suggested Hardware for performing load tests up to 5000 concurrent users: Intel CPU i7 / 64 GB Memory / Disk: 1024 GB
Rule of Thumb for Amazon EC2 Instances
- Per EC2 vCPU, 100 virtual users can simulated
- Required Memory: 5 GB + (1 GB per 100 virtual users)
Environment and Location
Tests performed from ‘Measuring Agents’ which are virtualized or which run in a container environment measure often
incorrect results. Because additional CPU and Network delays occur at virtualization/container level.
It’s recommended that you use BARE-METAL-SERVERS to perform your tests. Alternatively you can also use Amazon EC2 Cloud instances.
You can place your ‘Measuring Agents’ at any location (anywhere at the internet or inside your local DMZ). Depending
on which kind of traffic you have to test. Note that your Measuring Agents - usually running on TCP/IP port 8080 (HTTPS) - must be
reachable form the ‘Portal Server’, and that you have to enable the corresponding inbound firewall rule.
Network & System Tuning
In /etc/sysctl.conf add:
# TCP/IP Tuning
# =============
fs.file-max = 524288
net.ipv4.tcp_max_syn_backlog = 2048
net.ipv4.tcp_synack_retries = 3
net.ipv4.tcp_max_orphans = 65536
net.ipv4.tcp_fin_timeout = 30
net.ipv4.ip_local_port_range = 16384 60999
net.core.somaxconn = 256
net.core.rmem_max = 1048576
net.core.wmem_max = 1048576
in /etc/security/limits.conf add:
# TCP/IP Tuning
# =============
* soft     nproc          262140
* hard     nproc          262140
* soft     nofile         262140
* hard     nofile         262140
root soft     nproc          262140
root hard     nproc          262140
root soft     nofile         262140
root hard     nofile         262140
Enter:
systemctl show -p TasksMax user-0
output: TasksMax=8966
if you get a value less than 262140 then add in /etc/systemd/system.conf
# Ubuntu Tuning
# =============
DefaultTasksMax=262140
Reboot the system and verify the settings.
Enter: ulimit -n
output: 262140
Enter: systemctl show -p TasksMax user-0
output: TasksMax=262140
Install Dependencies
Install haveged
sudo apt-get update
sudo apt-get install haveged
sudo ufw allow ssh
sudo ufw allow 8080/tcp
sudo ufw logging off
sudo ufw enable
Enter: sudo ufw status verbose
Status: active
Logging: off
Default: deny (incoming), allow (outgoing), disabled (routed)
New profiles: skip

To                         Action      From
--                         ------      ----
22/tcp                     ALLOW IN    Anywhere
8080/tcp                   ALLOW IN    Anywhere
22/tcp (v6)                ALLOW IN    Anywhere (v6)
8080/tcp (v6)              ALLOW IN    Anywhere (v6)
Install OpenJDK Java 8 and 11 / For Intel and AMD CPUs
Get the Java Installation Kits
wget https://download.java.net/openjdk/jdk8u41/ri/openjdk-8u41-b04-linux-x64-14_jan_2020.tar.gz
wget https://download.java.net/java/GA/jdk11/13/GPL/openjdk-11.0.1_linux-x64_bin.tar.gz
Install OpenJDK Java 8
gunzip openjdk-8u41-b04-linux-x64-14_jan_2020.tar.gz
tar -xvf  openjdk-8u41-b04-linux-x64-14_jan_2020.tar
rm openjdk-8u41-b04-linux-x64-14_jan_2020.tar
sudo bash *******
mkdir /opt/OpenJDK
mv java-se-8u41-ri /opt/OpenJDK
cd /opt/OpenJDK
ls -al
chown root -R java-se-8u41-ri
chgrp root -R java-se-8u41-ri
exit # end sudo bash
Verify the Java 8 installation.
/opt/OpenJDK/java-se-8u41-ri/bin/java -version

openjdk version "1.8.0_41"
OpenJDK Runtime Environment (build 1.8.0_41-b04)
OpenJDK 64-Bit Server VM (build 25.40-b25, mixed mode)
Install OpenJDK Java 11
gunzip openjdk-11.0.1_linux-x64_bin.tar.gz
tar -xvf openjdk-11.0.1_linux-x64_bin.tar
rm openjdk-11.0.1_linux-x64_bin.tar
sudo bash
mv jdk-11.0.1 /opt/OpenJDK
cd /opt/OpenJDK
ls -al
chown root -R jdk-11.0.1
chgrp root -R jdk-11.0.1
Execute the following commands (still as sudo bash):
update-alternatives --install "/usr/bin/java" "java" "/opt/OpenJDK/jdk-11.0.1/bin/java" 1
update-alternatives --install "/usr/bin/javac" "javac" "/opt/OpenJDK/jdk-11.0.1/bin/javac" 1
update-alternatives --install "/usr/bin/keytool" "keytool" "/opt/OpenJDK/jdk-11.0.1/bin/keytool" 1
update-alternatives --install "/usr/bin/jar" "jar" "/opt/OpenJDK/jdk-11.0.1/bin/jar" 1
update-alternatives --set "java" "/opt/OpenJDK/jdk-11.0.1/bin/java"
update-alternatives --set "javac" "/opt/OpenJDK/jdk-11.0.1/bin/javac"
update-alternatives --set "keytool" "/opt/OpenJDK/jdk-11.0.1/bin/keytool"
update-alternatives --set "jar" "/opt/OpenJDK/jdk-11.0.1/bin/jar"
exit # end sudo bash
Verify the Java 11 installation.
java -version

openjdk version "11.0.1" 2018-10-16
OpenJDK Runtime Environment 18.9 (build 11.0.1+13)
OpenJDK 64-Bit Server VM 18.9 (build 11.0.1+13, mixed mode)
Install OpenJDK Java 8 and 11 / For Raspberry Pi 4 Model B / ARM CPU
sudo apt install openjdk-8-jre-headless
sudo apt install openjdk-8-jdk-headless
sudo apt install openjdk-11-jre-headless
sudo apt install openjdk-11-jdk-headless
Verify the Java installation.
java -version

openjdk version "11.0.10" 2021-01-19
OpenJDK Runtime Environment (build 11.0.10+9-Ubuntu-0ubuntu1.20.10)
OpenJDK 64-Bit Server VM (build 11.0.10+9-Ubuntu-0ubuntu1.20.10, mixed mode)
Install PowerShell (optional)
You only need to install powershell if you run load tests with powershell scripts.
# Install PowerShell
sudo snap install powershell --classic

# Start PowerShell
pwsh
exit
Install Ubuntu Desktop for Selenium (optional)
Install the Display Manager
Install Ubuntu Desktop (which includes also Firefox)
sudo apt install ubuntu-desktop
Then reboot the machine.
Install Xvfb
sudo apt-get install xvfb
Install Chrome
wget -q -O - https://dl-ssl.google.com/linux/linux_signing_key.pub | sudo apt-key add -
sudo sh -c 'echo "deb https://dl.google.com/linux/chrome/deb/ stable main" >> /etc/apt/sources.list.d/google.list'
sudo apt-get update
sudo apt-get install google-chrome-stable
Install the Measuring Agent
Create the DKFQS account which is running the Measuring Agent
sudo adduser dkfqs # follow the questions, remember or write down the password
Install the Measuring Agent
Login with the dkfqs account (SSH) - or - Enter: sudo -u dkfqs bash |
OR: Install Samba to get convenient access to /home/dkfqs as Samba dkfqs user
Create the directory /home/dkfqs/agent (as dkfqs user):
cd /home/dkfqs
mkdir agent
Create the following sub-directories at /home/dkfqs/agent (as dkfqs user):
- bin
- config
- internalData
- log
- scripts
- usersData
cd /home/dkfqs/agent
mkdir bin config internalData log scripts usersData
Copy the following files to the bin directory /home/dkfqs/agent/bin
- bcpkix-jdk15on-160.jar
- bcprov-jdk15on-160.jar
- bctls-jdk15on-160.jar
- DKFQSMeasuringAgent.jar
- chromedriver (optional, for Selenium)
- geckodriver (optional, for Selenium)
chmod 755 chromedriver
chmod 755 geckodriver
Copy the following files to the config directory /home/dkfqs/agent/config
- datacollector.properties
- measuringagent.properties
Modify the measuringagent.properties file. Set the following properties:
- HttpsCertificateCN (set the public DNS name or the IP address for the automatically generated SSL/TLS server certificate)
- HttpsCertificateIP (set the public IP address for the automatically generated SSL/TLS server certificate)
- PowerShellCore6Path
- OpenJDK8JavaPath
- OpenJDK8JavaJobDefaultXmx (set around 20% of total OS memory - example: 1024m)
- OpenJDK11JavaPath
- OpenJDK11JavaJobDefaultXmx (set around 20% of total OS memory - example: 1024m)
Example: datacollector.properties
# local TCP/HTTPS data collector ports
DataCollectorPortStartRange=44444
DataCollectorPortEndRange=45000
DataCollectorPortExcludeList=

LogLevel=info
MaxLifeTimeMinutes=240

MaxWebSocketConnectTimeSeconds=14400
MaxInboundWebSocketTrafficPerConnection=67108864
MaxInboundWebSocketPayloadPerFrame=1048576
MaxInboundWebSocketFramesPerIPTimeFrame=10
MaxInboundWebSocketFramesPerIPLimit=1000

RealtimeStatisticsSamplingGranularityMillis=4000
Example: measuringagent.properties
HttpsPort=8080
HttpsCertificateCN=agent2.realload.com
HttpsCertificateIP=83.150.39.43
LogLevel=info

# AuthTokenEnabled: true or false, if true = the AuthTokenValue must be configured at portal server measuring agent settings
AuthTokenEnabled=false
# If AuthTokenEnabled is true, but AuthTokenValue is undefined or an empty string, then the (permanent) AuthTokenValue is automatically generated and printed at the log output
# AuthTokenValue=

MeasuringAgentLogFile=/home/dkfqs/agent/log/MeasuringAgent.log
MeasuringAgentInternalDataDirectory=/home/dkfqs/agent/internalData
MeasuringAgentUsersDataRootDirectory=/home/dkfqs/agent/usersData

ApiV1MaxRequestSizeMB=256
ApiV1WorkerThreadBusyTimeoutSeconds=330
ApiV1WorkerThreadExecutionTimeoutSeconds=300

MaxWebSocketConnectTimeSeconds=14400
MaxInboundWebSocketTrafficPerConnection=160000000
MaxInboundWebSocketPayloadPerFrame=80000000
MaxInboundWebSocketFramesPerIPTimeFrame=10
MaxInboundWebSocketFramesPerIPLimit=1000

DataCollectorProcessJavaPath=java
DataCollectorProcessJavaXmx=512m
DataCollectorPropertiesPath=/home/dkfqs/agent/config/datacollector.properties

# Settings for Supported Scripts / Programming Languages
PowerShellCore6Path=/snap/bin/pwsh
OpenJDK8JavaPath=/opt/OpenJDK/java-se-8u41-ri/bin/java
OpenJDK8JavaJobDefaultXmx=512m
OpenJDK11JavaPath=/opt/OpenJDK/jdk-11.0.1/bin/java
OpenJDK11JavaJobDefaultXmx=512m

# Limits
# LimitMaxUsersPerJob=500
# LimitMaxJobDurationSeconds=300

# Settings for Synthetic Monitoring
SyntheticMonitoringDataCollectorProcessJavaXmx=128m
SyntheticMonitoringOpenJDK8JavaJobXmx=256m
SyntheticMonitoringOpenJDK11JavaJobXmx=256m
SyntheticMonitoringLimitMaxUsersPerJob=5
SyntheticMonitoringLimitMaxJobDurationSeconds=300
SyntheticMonitoringLimitMaxLoopsPerUser=5

# Settings for Tests Jobs which require a (virtual) display. If VirtualDisplayPerRemoteUserIdEnabled = false then the value of DebugDisplay is used
DebugDisplay=:0.0
VirtualDisplayPerRemoteUserIdEnabled=true
VirtualDisplayType=Xvfb
XvfbPath=Xvfb
SeleniumTestJobsEnabled=true
SeleniumLimitMaxUsersPerJob=20
SeleniumWebBrowserTypesSupported=Chrome,Firefox
SeleniumChromeDriverPath=/home/dkfqs/agent/bin/chromedriver
SeleniumGeckoDriverPath=/home/dkfqs/agent/bin/geckodriver
SeleniumEdgeDriverPath=
First Test - Start the Measuring Agent manually (as dkfqs user)
cd /home/dkfqs/agent/bin
export CLASSPATH=bcpkix-jdk15on-160.jar:bcprov-jdk15on-160.jar:bctls-jdk15on-160.jar:DKFQSMeasuringAgent.jar
java -Xmx512m -DdkfqsMeasuringAgentProperties=../config/measuringagent.properties -Dnashorn.args="--no-deprecation-warning" com.dkfqs.measuringagent.internal.StartDKFQSMeasuringAgent

Data Collector service port range from 44444 to 45000
LimitMaxUsersPerJob = unlimited
LimitMaxJobDurationSeconds = unlimited
X509 TLS server certificate generated for CN = 192.168.0.51
Internal RSA 2048 bit keypair generated in 373 ms
2021-03-11 18:20:27.947 | QAHTTPd | WARN | QAHTTPd V1.3-U started
2021-03-11 18:20:27.990 | QAHTTPd | INFO | HTTPS server starting at port 8080
2021-03-11 18:20:28.089 | QAHTTPd | INFO | HTTPS server ready at port 8080
Create the Measuring Agent Startup Script (as root)
sudo bash # become root
cd /etc/init.d
vi MeasuringAgent
Edit - create /etc/init.d/MeasuringAgent
#!/bin/sh
# /etc/init.d/MeasuringAgent
# install with: update-rc.d MeasuringAgent defaults

### BEGIN INIT INFO
# Provides:          MeasuringAgent
# Required-Start:    $local_fs $network $time $syslog
# Required-Stop:     $local_fs $network
# Default-Start:     2 3 4 5
# Default-Stop:      0 1 6
# Short-Description: Start MeasuringAgent daemon at boot time
# Description:       MeasuringAgent daemon
### END INIT INFO

case "$1" in
  start)
    if [ -f /home/dkfqs/agent/log/MeasuringAgent.log ]; then
       mv /home/dkfqs/agent/log/MeasuringAgent.log /home/dkfqs/agent/log/MeasuringAgent.log_$(date +"%Y_%m_%d_%H_%M")
    fi
    sudo -H -u dkfqs bash -c 'CLASSPATH=/home/dkfqs/agent/bin/bcpkix-jdk15on-160.jar:/home/dkfqs/agent/bin/bcprov-jdk15on-160.jar:/home/dkfqs/agent/bin/bctls-jdk15on-160.jar:/home/dkfqs/agent/bin/DKFQSMeasuringAgent.jar;export CLASSPATH;nohup java -Xmx512m -DdkfqsMeasuringAgentProperties=/home/dkfqs/agent/config/measuringagent.properties -Dnashorn.args="--no-deprecation-warning" com.dkfqs.measuringagent.internal.StartDKFQSMeasuringAgent -autoAdjustMemory -osReservedMemory 1GB 1>/home/dkfqs/agent/log/MeasuringAgent.log 2>&1 &'
    ;;
  stop)
       PID=`ps -o pid,args -e | grep "StartDKFQSMeasuringAgent" | egrep -v grep | awk '{print $1}'`
       if [ ! -z "$PID" ] ; then
          echo "MeasuringAgent stopped with pid(s) : $PID"
          kill -9 ${PID} 1> /dev/null 2>&1
       fi
    ;;
  status)
       PID=`ps -o pid,args -e | grep "StartDKFQSMeasuringAgent" | egrep -v grep | awk '{print $1}'`
       if [ ! -z "$PID" ] ; then
          echo "MeasuringAgent running with pid(s) : $PID"
       else
          echo "No MeasuringAgent running"
       fi
    ;;
  *)
    echo "Usage: /etc/init.d/MeasuringAgent {start|stop|status}"
    exit 1
    ;;
esac

exit 0
The Java memory of the Measuring Agent should be set in the startup script as shown in the table below:
| OS Physical Memory |
Java -Xmx setting |
| <2 GiB |
256m |
| 2..3 GiB |
512m |
| 4..7 GiB |
512m |
| 8..15 GiB |
1536m |
| 16..31 GiB |
3072m |
| 32..63 GiB |
4096m |
| 64..96 GiB |
6144m |
| >96 GiB |
8192m |
| Odd number of GiB should be rounded up (e.g. 7.7 = 8 = 1536m). |
|
Change owner and file protection of /etc/init.d/MeasuringAgent (root at /etc/init.d):
chown root MeasuringAgent
chgrp root MeasuringAgent
chmod 755 MeasuringAgent
Register /etc/init.d/MeasuringAgent to be started at system boot (root at /etc/init.d):
update-rc.d MeasuringAgent defaults
Reboot the system. Login as dkfqs and check /home/dkfqs/agent/log/MeasuringAgent.log
Register and Verify the Measuring Agent
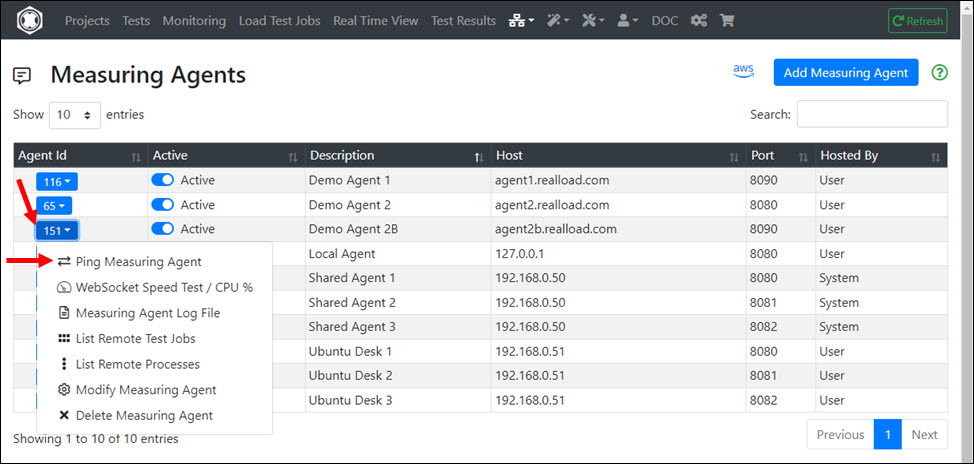
- Sign-in at the ‘Portal Server’
- Select at Top Navigation ‘Measuring Agents’
- Add your new Measuring Agent
- Ping the Measuring Agent at application level

2 - Ubuntu: Cluster Controller manual install
Ubuntu: Cluster Controller Install Instructions
Prerequisites
Supported Hardware
- Amazon EC2 Cloud instance, or
- Own hosted server with any Intel or AMD CPU
Minimum Requirements
- Minimum required CPU Cores of Processor: 2
- Minimum required Memory: 8 GB
- Minimum required Disk: 64 GB
- Minimum required Network Speed: 100 Mbps (1000 Mbps or faster strongly recommended)
Environment and Location
In terms of network technology, the cluster controller should be as close as possible to the cluster members.
The simultaneous operation of a cluster controller together with one or more measuring agents on the same machine is possible, although not recommended.
This means that the cluster controller should be operated on its own machine - especially if a cluster contains more than 100 members.
The time difference of the operating system time between the cluster controller and the cluster members must not be greater than one second (1000 ms).
It is recommended to use the same time server for the cluster controller and the cluster members.
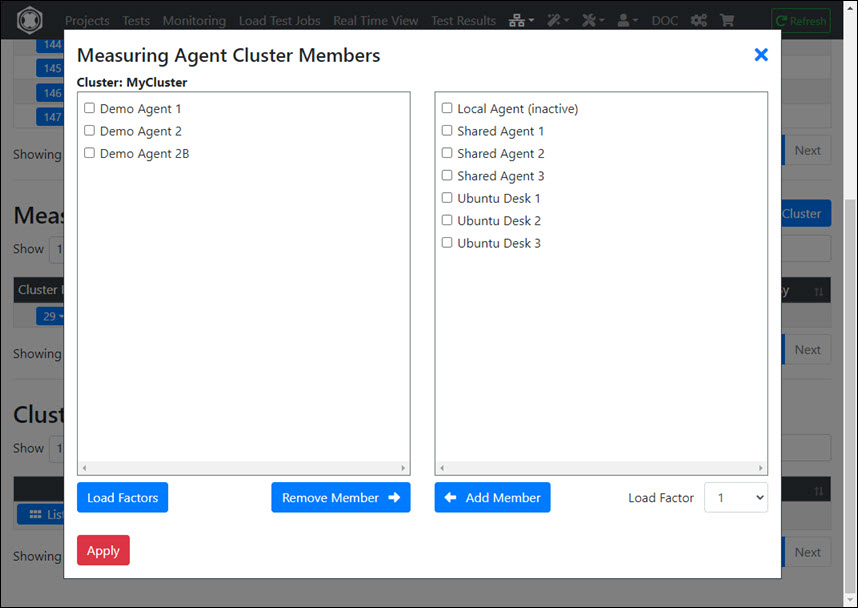
The Portal Server supports the use of multiple cluster controllers. Each cluster controller can manage multiple clusters. And each measuring agent can be a member of multiple clusters.
Network & System Tuning
In /etc/sysctl.conf add:
# TCP/IP Tuning
# =============
fs.file-max = 524288
net.ipv4.tcp_max_syn_backlog = 2048
net.ipv4.tcp_synack_retries = 3
net.ipv4.tcp_max_orphans = 65536
net.ipv4.tcp_fin_timeout = 30
net.ipv4.ip_local_port_range = 16384 60999
net.core.somaxconn = 256
net.core.rmem_max = 1048576
net.core.wmem_max = 1048576
in /etc/security/limits.conf add:
# TCP/IP Tuning
# =============
* soft     nproc          262140
* hard     nproc          262140
* soft     nofile         262140
* hard     nofile         262140
root soft     nproc          262140
root hard     nproc          262140
root soft     nofile         262140
root hard     nofile         262140
Enter:
systemctl show -p TasksMax user-0
output: TasksMax=8966
if you get a value less than 262140 then add in /etc/systemd/system.conf
# Ubuntu Tuning
# =============
DefaultTasksMax=262140
Reboot the system and verify the settings.
Enter: ulimit -n
output: 262140
Enter: systemctl show -p TasksMax user-0
output: TasksMax=262140
Install Dependencies
Install haveged
sudo apt-get update
sudo apt-get install haveged
Install OpenJDK 11
Get the Java Installation Kit
wget https://download.java.net/java/GA/jdk11/13/GPL/openjdk-11.0.1_linux-x64_bin.tar.gz
Install OpenJDK Java 11
gunzip openjdk-11.0.1_linux-x64_bin.tar.gz
tar -xvf openjdk-11.0.1_linux-x64_bin.tar
rm openjdk-11.0.1_linux-x64_bin.tar
sudo bash
mv jdk-11.0.1 /opt/OpenJDK
cd /opt/OpenJDK
ls -al
chown root -R jdk-11.0.1
chgrp root -R jdk-11.0.1
Execute the following commands (still as sudo bash):
update-alternatives --install "/usr/bin/java" "java" "/opt/OpenJDK/jdk-11.0.1/bin/java" 1
update-alternatives --install "/usr/bin/javac" "javac" "/opt/OpenJDK/jdk-11.0.1/bin/javac" 1
update-alternatives --install "/usr/bin/keytool" "keytool" "/opt/OpenJDK/jdk-11.0.1/bin/keytool" 1
update-alternatives --install "/usr/bin/jar" "jar" "/opt/OpenJDK/jdk-11.0.1/bin/jar" 1
update-alternatives --set "java" "/opt/OpenJDK/jdk-11.0.1/bin/java"
update-alternatives --set "javac" "/opt/OpenJDK/jdk-11.0.1/bin/javac"
update-alternatives --set "keytool" "/opt/OpenJDK/jdk-11.0.1/bin/keytool"
update-alternatives --set "jar" "/opt/OpenJDK/jdk-11.0.1/bin/jar"
exit # end sudo bash
Verify the Java 11 installation.
java -version

openjdk version "11.0.1" 2018-10-16
OpenJDK Runtime Environment 18.9 (build 11.0.1+13)
OpenJDK 64-Bit Server VM 18.9 (build 11.0.1+13, mixed mode)
Install the Cluster Controller
Create the DKFQS account which is running the Cluster Controller
sudo adduser dkfqs # follow the questions, remember or write down the password
Install the Cluster Controller
Login with the dkfqs account (SSH) - or - Enter: sudo -u dkfqs bash |
OR: Install Samba to get convenient access to /home/dkfqs as Samba dkfqs user
Create the directory /home/dkfqs/controller (as dkfqs user):
cd /home/dkfqs
mkdir controller
Create the following sub-directories at /home/dkfqs/controller (as dkfqs user):
- bin
- config
- internalData
- log
- scripts
- usersData
cd /home/dkfqs/controller
mkdir bin config internalData log scripts usersData
Copy the following files to the bin directory /home/dkfqs/controller/bin
- bcpkix-jdk15on-160.jar
- bcprov-jdk15on-160.jar
- bctls-jdk15on-160.jar
- DKFQSMeasuringAgent.jar
Copy the following files to the config directory /home/dkfqs/controller/config
- clustercontroller.properties
Modify the clustercontroller.properties file. Set the following properties:
- HttpsCertificateCN (set the public DNS name or the IP address for the automatically generated SSL/TLS server certificate)
- HttpsCertificateIP (set the public IP address for the automatically generated SSL/TLS server certificate)
- AuthTokenValue
Example: clustercontroller.properties
HttpsPort=8083
HttpsCertificateCN=192.168.0.50
HttpsCertificateIP=192.168.0.50
LogLevel=info

# AuthTokenEnabled: true or false, if true = the AuthTokenValue must be configured at portal server measuring agent cluster settings
AuthTokenEnabled=true
# If AuthTokenEnabled is true, but AuthTokenValue is undefined or an empty string, then the (permanent) AuthTokenValue is automatically generated and printed at the log output
AuthTokenValue=aberaber

ClusterControllerLogFile=/home/dkfqs/controller/log/ClusterController.log
ClusterControllerInternalDataDirectory=/home/dkfqs/controller/internalData
ClusterControllerUsersDataRootDirectory=/home/dkfqs/controller/usersData

ApiMaxRequestSizeMB=256
ApiWorkerThreadBusyTimeoutSeconds=330
ApiWorkerThreadExecutionTimeoutSeconds=300

MaxWebSocketConnectTimeSeconds=14400
MaxInboundWebSocketTrafficPerConnection=83886080
MaxInboundWebSocketPayloadPerFrame=20971520
MaxInboundWebSocketFramesPerIPTimeFrame=10
MaxInboundWebSocketFramesPerIPLimit=1000
First Test - Start the Cluster Controller manually (as dkfqs user)
cd /home/dkfqs/controller/bin
export CLASSPATH=bcpkix-jdk15on-160.jar:bcprov-jdk15on-160.jar:bctls-jdk15on-160.jar:DKFQSMeasuringAgent.jar
java -Xmx512m -DdkfqsClusterControllerProperties=../config/clustercontroller.properties -Dnashorn.args="--no-deprecation-warning" com.dkfqs.measuringagent.clustercontroller.StartDKFQSClusterController

Cluster Controller V4.0.4
Max. Memory = 512 MB
AuthTokenEnabled = true
AuthTokenValue = ********
X509 TLS server certificate generated for CN = 192.168.0.50
Internal RSA 2048 bit keypair generated in 305 ms
2022-01-29 20:45:20.118 | QAHTTPd | WARN | QAHTTPd V1.3-Y started
2022-01-29 20:45:20.219 | QAHTTPd | INFO | HTTPS server starting at port 8083
2022-01-29 20:45:20.278 | QAHTTPd | INFO | HTTPS server ready at port 8083
Create the Cluster Controller Startup Script (as root)
sudo bash # become root
cd /etc/init.d
vi ClusterController
Edit - create /etc/init.d/ClusterController
#!/bin/sh
# /etc/init.d/ClusterController
# install with: update-rc.d ClusterController defaults

### BEGIN INIT INFO
# Provides:          ClusterController
# Required-Start:    $local_fs $network $time $syslog
# Required-Stop:     $local_fs $network
# Default-Start:     2 3 4 5
# Default-Stop:      0 1 6
# Short-Description: Start ClusterController daemon at boot time
# Description:       ClusterController daemon
### END INIT INFO

case "$1" in
  start)
    if [ -f /home/dkfqs/controller/log/ClusterController.log ]; then
       mv /home/dkfqs/controller/log/ClusterController.log /home/dkfqs/controller/log/ClusterController.log_$(date +"%Y_%m_%d_%H_%M")
    fi
    sudo -H -u dkfqs bash -c 'CLASSPATH=/home/dkfqs/controller/bin/bcpkix-jdk15on-160.jar:/home/dkfqs/controller/bin/bcprov-jdk15on-160.jar:/home/dkfqs/controller/bin/bctls-jdk15on-160.jar:/home/dkfqs/controller/bin/DKFQSMeasuringAgent.jar;export CLASSPATH;nohup java -Xmx6144m -DdkfqsClusterControllerProperties=/home/dkfqs/controller/config/clustercontroller.properties -Dnashorn.args="--no-deprecation-warning" com.dkfqs.measuringagent.clustercontroller.StartDKFQSClusterController 1>/home/dkfqs/controller/log/ClusterController.log 2>&1 &'
    ;;
  stop)
       PID=`ps -o pid,args -e | grep "StartDKFQSClusterController" | egrep -v grep | awk '{print $1}'`
       if [ ! -z "$PID" ] ; then
          echo "ClusterController stopped with pid(s) : $PID"
          kill -9 ${PID} 1> /dev/null 2>&1
       fi
    ;;
  status)
       PID=`ps -o pid,args -e | grep "StartDKFQSClusterController" | egrep -v grep | awk '{print $1}'`
       if [ ! -z "$PID" ] ; then
          echo "ClusterController running with pid(s) : $PID"
       else
          echo "No ClusterController running"
       fi
    ;;
  *)
    echo "Usage: /etc/init.d/ClusterController {start|stop|status}"
    exit 1
    ;;
esac

exit 0
Change owner and file protection of /etc/init.d/ClusterController (root at /etc/init.d):
chown root ClusterController
chgrp root ClusterController
chmod 755 ClusterController
Register /etc/init.d/ClusterController to be started at system boot (root at /etc/init.d):
update-rc.d ClusterController defaults
Reboot the system. Login as dkfqs and check /home/dkfqs/controller/log/ClusterController.log
Define a Cluster and Verify the Cluster Controller
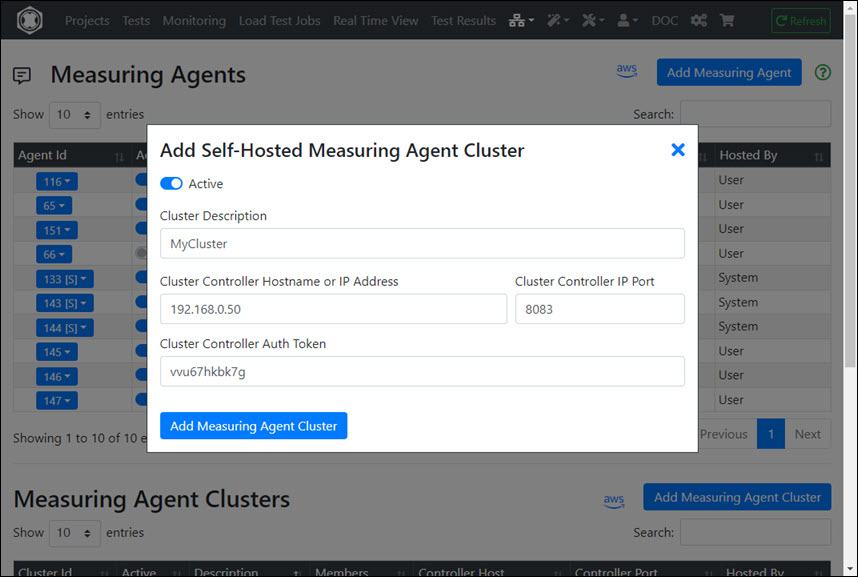
- Sign-in at the ‘Portal Server’
- Select at Top Navigation ‘Measuring Agents’
- Add a ‘Measuring Agent Cluster’
- Add one or more cluster members
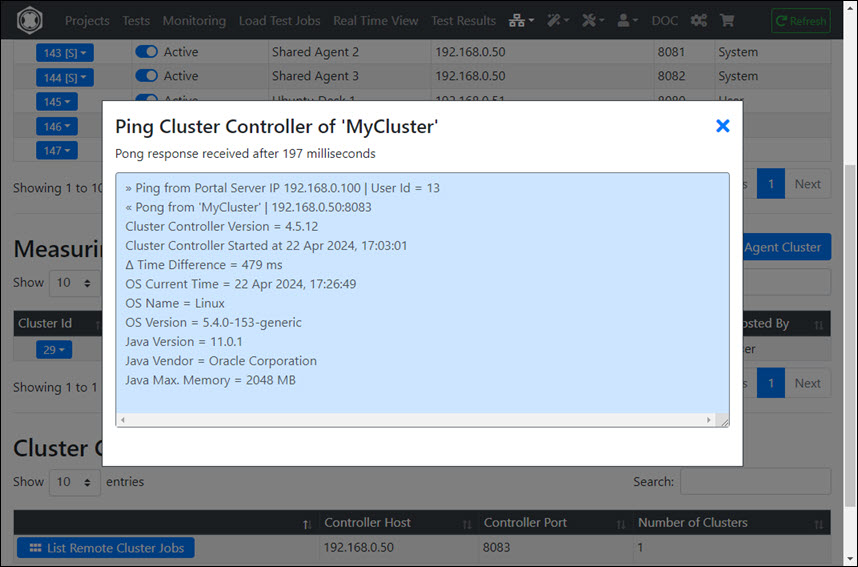
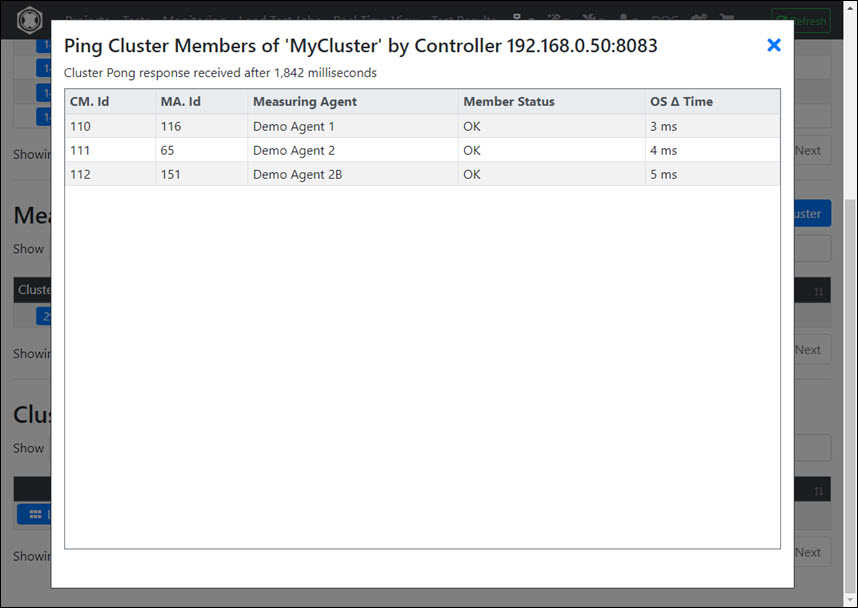
- Ping the Cluster Controller at application level
- Ping the cluster members by the Cluster Controller, and verify that the absolute value of OS Δ Time for each cluster member is not greater than 1000 ms

3 - Ubuntu: Portal Server manual install
Ubuntu: Portal Server Install Instructions
Prerequisites
Supported Hardware
- Amazon EC2 Cloud instances
- Own hosted Servers with any Intel or AMD CPU
Minimum Hardware Requirements
- Minimum required CPU Cores of Processor: 4
- Minimum required RAM: 16 GB
- Minimum required Disk: 512 GB
- Minimum required Network Speed: 1000 Mbps
Email Server
The Portal Server sends its emails via SMTP. You need an email server which receive and forward these SMTP messages.
Twilio SMS Gateway
If the Portal Server will be operated/configured in such a way that any person can “sign up”
(= self registration) you need a customer account for the Twilio SMS Gateway www.twilio.com/docs/sms
Note
You can add new portal users also directly from the Administrator Menu. In such a case an SMS gateway is not required.
Network & System Tuning
In /etc/sysctl.conf add:
# TCP/IP Tuning
# =============
fs.file-max = 524288
net.ipv4.tcp_max_syn_backlog = 2048
net.ipv4.tcp_synack_retries = 3
net.ipv4.tcp_max_orphans = 65536
net.ipv4.tcp_fin_timeout = 30
net.ipv4.ip_local_port_range = 16384 60999
net.core.somaxconn = 256
net.core.rmem_max = 1048576
net.core.wmem_max = 1048576
In /etc/security/limits.conf add:
# TCP/IP Tuning
# =============
* soft     nproc          262140
* hard     nproc          262140
* soft     nofile         262140
* hard     nofile         262140
root soft     nproc          262140
root hard     nproc          262140
root soft     nofile         262140
root hard     nofile         262140
Enter:
systemctl show -p TasksMax user-0
output: TasksMax=8966
if you get a value less than 262140 then add in /etc/systemd/system.conf
# Ubuntu Tuning
# =============
DefaultTasksMax=262140
Reboot the system and verify the settings.
Enter: ulimit -n
output: 262140
Enter: systemctl show -p TasksMax user-0
output: TasksMax=262140
Forward the external TCP/IP server port 80 (HTTP) to port 8000, and forward external port 443 (HTTPS) to port 8001
Install ifupdown
sudo apt-get update
sudo apt-get install ifupdown
Create/edit the file DKFQSiptables in /etc/network/if-pre-up.d/ and add:
#!/bin/sh
iptables -t nat -A PREROUTING -p tcp --dport 80 -j REDIRECT --to-port 8000
iptables -t nat -I OUTPUT -p tcp -d 127.0.0.1 --dport 80 -j REDIRECT --to-ports 8000
iptables -t nat -A PREROUTING -p tcp --dport 443 -j REDIRECT --to-port 8001
iptables -t nat -I OUTPUT -p tcp -d 127.0.0.1 --dport 443 -j REDIRECT --to-ports 8001
exit 0
Then give execute permission to /etc/network/if-pre-up.d/DKFQSiptables :
sudo chmod 755 /etc/network/if-pre-up.d/DKFQSiptables
Reboot the machine and check with:
sudo iptables -L -t nat

> Chain PREROUTING (policy ACCEPT)
> target     prot opt source               destination
> REDIRECT   tcp  --  anywhere             anywhere             tcp dpt:http redir ports 8000
> REDIRECT   tcp  --  anywhere             anywhere             tcp dpt:https redir ports 8001
> REDIRECT   tcp  --  anywhere             anywhere             tcp dpt:http redir ports 8000
> REDIRECT   tcp  --  anywhere             anywhere             tcp dpt:https redir ports 8001
>
> Chain INPUT (policy ACCEPT)
> target     prot opt source               destination
>
> Chain OUTPUT (policy ACCEPT)
> target     prot opt source               destination
> REDIRECT   tcp  --  anywhere             localhost            tcp dpt:https redir ports 8001
> REDIRECT   tcp  --  anywhere             localhost            tcp dpt:http redir ports 8000
> REDIRECT   tcp  --  anywhere             localhost            tcp dpt:https redir ports 8001
> REDIRECT   tcp  --  anywhere             localhost            tcp dpt:http redir ports 8000
>
> Chain POSTROUTING (policy ACCEPT)
> target     prot opt source               destination
Install Dependencies
Install fontconfig
sudo apt-get update
sudo apt-get install fontconfig
Install haveged
sudo apt-get update
sudo apt-get install haveged
Install SQLite
sudo apt-get update
sudo apt install sqlite
Install OpenJDK Java 8 and 11
Get the Java Installation Kits
wget https://download.java.net/openjdk/jdk8u41/ri/openjdk-8u41-b04-linux-x64-14_jan_2020.tar.gz
wget https://download.java.net/java/GA/jdk11/13/GPL/openjdk-11.0.1_linux-x64_bin.tar.gz
Install OpenJDK Java 8
gunzip openjdk-8u41-b04-linux-x64-14_jan_2020.tar.gz
tar -xvf  openjdk-8u41-b04-linux-x64-14_jan_2020.tar
rm openjdk-8u41-b04-linux-x64-14_jan_2020.tar
sudo bash *******
mkdir /opt/OpenJDK
mv java-se-8u41-ri /opt/OpenJDK
cd /opt/OpenJDK
ls -al
chown root -R java-se-8u41-ri
chgrp root -R java-se-8u41-ri
exit # end sudo bash
Verify the Java 8 installation.
/opt/OpenJDK/java-se-8u41-ri/bin/java -version

openjdk version "1.8.0_41"
OpenJDK Runtime Environment (build 1.8.0_41-b04)
OpenJDK 64-Bit Server VM (build 25.40-b25, mixed mode)
Install OpenJDK Java 11
gunzip openjdk-11.0.1_linux-x64_bin.tar.gz
tar -xvf openjdk-11.0.1_linux-x64_bin.tar
rm openjdk-11.0.1_linux-x64_bin.tar
sudo bash
mv jdk-11.0.1 /opt/OpenJDK
cd /opt/OpenJDK
ls -al
chown root -R jdk-11.0.1
chgrp root -R jdk-11.0.1
Execute the following commands (still as sudo bash):
update-alternatives --install "/usr/bin/java" "java" "/opt/OpenJDK/jdk-11.0.1/bin/java" 1
update-alternatives --install "/usr/bin/javac" "javac" "/opt/OpenJDK/jdk-11.0.1/bin/javac" 1
update-alternatives --install "/usr/bin/keytool" "keytool" "/opt/OpenJDK/jdk-11.0.1/bin/keytool" 1
update-alternatives --install "/usr/bin/jar" "jar" "/opt/OpenJDK/jdk-11.0.1/bin/jar" 1
update-alternatives --set "java" "/opt/OpenJDK/jdk-11.0.1/bin/java"
update-alternatives --set "javac" "/opt/OpenJDK/jdk-11.0.1/bin/javac"
update-alternatives --set "keytool" "/opt/OpenJDK/jdk-11.0.1/bin/keytool"
update-alternatives --set "jar" "/opt/OpenJDK/jdk-11.0.1/bin/jar"
exit # end sudo bash
Verify the Java 11 installation.
java -version

openjdk version "11.0.1" 2018-10-16
OpenJDK Runtime Environment 18.9 (build 11.0.1+13)
OpenJDK 64-Bit Server VM 18.9 (build 11.0.1+13, mixed mode)
Install the Portal Server
Create the DKFQS account which is running the Portal Server
sudo adduser dkfqs # follow the questions, remember or write down the password
Install the Portal Server
Login with the dkfqs account (SSH) - or - Enter: sudo -u dkfqs bash |
OR: Install Samba to get convenient access to /home/dkfqs as Samba dkfqs user
Create the directory /home/dkfqs/portal (as dkfqs user):
cd /home/dkfqs
mkdir portal
Create the following sub-directories at /home/dkfqs/agent (as dkfqs user):
- backup
- bin
- config
- db
- developerExamples
- htdocs
- javaUsersLib
- jks
- log
- reportTemplate
- scripts
- temp
- usersLib
- usersData
cd /home/dkfqs/portal
mkdir backup bin config db developerExamples htdocs javaUsersLib jks log reportTemplate scripts temp usersLib usersData
Copy the following files to the bin directory /home/dkfqs/portal/bin
- bcpkix-jdk15on-160.jar
- bcprov-jdk15on-160.jar
- bctls-jdk15on-160.jar
- DKFQS.jar
- jasperreports-fonts-6.20.5.jar
Copy the following files to the db directory /home/dkfqs/portal/db
- CreateNewAdminDB.sql
- CreateNewMonitoringDB.sql
- CreateNewOperationsDB.sql
- CreateNewUsersDB.sql
Edit the file CreateNewUsersDB.sql and modify the following line to set the nickname, the email, the
phone number and the temporary password of the Admin account. Note: The nickname must always start with “Admin-”
insert into AdminAccountsTable (adminUserId, nickname, adminPrimaryEmail, adminPrimaryPhone, initialPassword) values (1, "Admin-One", "falarasorn@yahoo.com", "+43123456789", "ginkao1234");
Navigate to /home/dkfqs/portal/db and create the Admin, Operations and the Users DB (as dkfqs user):
sqlite3 AdminAccounts.db < CreateNewAdminDB.sql
sqlite3 Monitoring.db < CreateNewMonitoringDB.sql
sqlite3 Operations.db < CreateNewOperationsDB.sql
sqlite3 Users.db < CreateNewUsersDB.sql
Copy the following file to the htdocs directory /home/dkfqs/portal/htdocs
Navigate to /home/dkfqs/portal/htdocs and execute (as dkfqs user):
jar -xvf htdocs.jar
rm htdocs.jar   # delete the jar)
rm -R META-INF  # delete the META-INF directory)
Copy the following files to the javaUsersLib directory /home/dkfqs/portal/javaUsersLib
- com.dkfqs.selenium.jar
- commons-io-2.13.0.jar
- hamcrest-core-1.3.jar
- junit-4.13.2.jar
- selenium_bundle-4.10.0.jar
- selenium_bundle-4.12.1.jar
Copy the following file to the jks directory /home/dkfqs/portal/jks
Note
The file dkfqscom.jks is an expired SSL server certificate which is needed only temporary in order that you can test the start of the portal server. You should replace this file by an own one as soon as possible.
Copy the following files to the usersLib directory /home/dkfqs/portal/usersLib
- com.dkfqs.tools.jar
- DKFQSLibrary2.psm1 (optional)
Copy the following files to the bin directory /home/dkfqs/portal/reportTemplate
- AnnotationEvent.jasper
- Annotations.jasper
- ErrorCharts.jasper
- ErrorTypeDistribution.jrxml
- ErrorTypes.jasper
- JobProperties.jasper
- MonitoringGroup.jasper
- MonitoringGroupAvailability.jasper
- MonitoringJob.jasper
- MonitoringJobAvailability.jasper
- MonitoringJobPerformance.jasper
- OverviewStatistics.jasper
- SamplesThroughputPerSecond.jasper
- SummaryStatistic.jasper
- TestResults.jasper
- TestSpecificData.jasper
Copy the following files to the bin directory /home/dkfqs/portal/config
- dkfqs.properties
- rewrite.properties
- twilio.properties
Modify the dkfqs.properties file. Set the following properties:
- ServerName
- ServerDNSName
- DNSJavaDefaultDNSServers
- UsersMailServerHost
- UsersMailFrom
- UsersMailServerAuthUser
- UsersMailServerAuthPassword
- ServerStatusPageEnabledIPList
- AlertMailServerHost
- AlertMailFrom
- AlertMailToList
- AlertMailBounceAddress
- AlertMailServerAuthUser
- AlertMailServerAuthPassword
Example: dkfqs.properties
IsProduction=true
ServerName=192.168.0.50
ServerDNSName=192.168.0.50
DiskDocumentRootDirectory=/home/dkfqs/portal/htdocs
SQLiteDBDirectory=/home/dkfqs/portal/db
ReportTemplateDirectory=/home/dkfqs/portal/reportTemplate/
JasperReportsTemporaryDirectory=/home/dkfqs/portal/temp/
UsersDataRootDirectory=/home/dkfqs/portal/usersData
OSProcessLogFile=/home/dkfqs/portal/log/DKFQS.log
LogLevel=info
StaticContentMaxAgeTime=7200
MaxHTTPRequestSize=20240000
MaxInvalidAnonymousSessionsPerIPLimit=32
AnonymousSessionTimeout=1200
MaxAnonymousSessionTime=21600
MaxWebSocketConnectTimeSeconds=14400
MaxInboundWebSocketTrafficPerConnection=67108864
MaxInboundWebSocketPayloadPerFrame=1048576
MaxInboundWebSocketFramesPerIPTimeFrame=10
MaxInboundWebSocketFramesPerIPLimit=1000
HTTPExternalServerPort=80
HTTPInternalServerPort=8000
HTTPSExternalServerPort=443
HTTPSInternalServerPort=8001
HTTPSKeyStoreFile=/home/dkfqs/portal/jks/dkfqscom.jks
HTTPSKeyStorePassword=topsecret
#
FileTreeApiMaxRequestSizeMB=256
FileTreeApiWorkerThreadBusyTimeoutSeconds=330
FileTreeApiWorkerThreadExecutionTimeoutSeconds=300
TestjobsApiMaxRequestSizeMB=256
TestjobsApiWorkerThreadBusyTimeoutSeconds=330
TestjobsApiWorkerThreadExecutionTimeoutSeconds=300
#
DNSJavaDefaultDNSServers=8.8.8.8,8.8.4.4
#
JavaSDK8BinaryPath=/opt/OpenJDK/java-se-8u41-ri/bin
JavaSDK11BinaryPath=/opt/OpenJDK/jdk-11.0.1/bin
HTTPTestWizardJavaCodeLibraries=/home/dkfqs/portal/usersLib/com.dkfqs.tools.jar
#
UserSignInURL=/SignIn
UsersMailServerHost=192.168.1.4
UsersMailFrom=xxxxxxxxx@xxxxxxx.com
UsersMailServerAuthUser=xxxxxxxxx@xxxxxxx.com
UsersMailServerAuthPassword=*********
UsersMailTransmitterThreads=2
UsersMailDebugSMTP=false
#
smsGatewaysClassNames=com.dkfqs.server.sms.twilio.TwilioSMSGateway
#
# ServerStatusPageEnabledIPList=127.0.0.1,192.168.0.99
ServerStatusPageEnabledIPList=*.*.*.*
AdminSignInURL=/AdminSignIn
AlertMailEnabled=true
AlertMailServerHost=192.168.1.4
AlertMailFrom=xxxxxxxxx@xxxxxxx.com
AlertMailToList=yyyyyyyyy@xxxxxxx.com,zzzzzzzzz@xxxxxxx.com
AlertMailBounceAddress=bbbbbbb@xxxxxxx.com
AlertMailServerAuthUser=xxxxxxxxx@xxxxxxx.com
AlertMailServerAuthPassword=*******
AlertMailDebugSMTP=false
AlertMailNotifyStartup=false
#
SecurityIpBlacklistBlockTime=900
SecurityMaxRequestsPerIpLimit=200
SecurityMaxRequestsPerIpTimeFrame=10
SecurityMaxInvalidRequestsPerIpLimit=12
SecurityMaxInvalidRequestsPerIpTimeFrame=60
SecurityMaxAnonymousFormSubmitPerIpLimit=8
SecurityMaxAnonymousFormSubmitPerIpTimeFrame=60
SecurityMaxAuthenticationFailuresPerIpLimit=5
SecurityMaxAuthenticationFailuresPerIpTimeFrame=60
#
MeasuringAgentConnectTimeout=10

# Support of license provider 'Real Load Pty Ltd / nopCommerce', if enabled then the LicenseProviderRealLoadPtyLtdNopCommerceCARootFileName is located in the config directory of the portal server
LicenseProviderRealLoadPtyLtdNopCommerceEnabled=true
LicenseProviderRealLoadPtyLtdNopCommerceCARootFileName=nopCommerceCARoot.pem

# Synthetic Monitoring settings
MonitoringJobSchedulerMainThreadIntervalSeconds=10
MonitoringJobSchedulerInitialDBLogLevel=warn
MonitoringJobSchedulerInitialStdoutLogLevel=info
MonitoringJobSchedulerInitialUserFileLogLevel=info
MonitoringGroupThreadsStartDelayMillis=1000

# Support for compiling Junit and Selenium Tests
JavaUsersLibDirectory=/home/dkfqs/portal/javaUsersLib
JavaJUnit4CompilerLibraries=hamcrest-core-1.3.jar,junit-4.13.2.jar
JavaJUnit4TestExecutionLibraries=com.dkfqs.selenium.jar,com.dkfqs.tools.jar,commons-io-2.13.0.jar,hamcrest-core-1.3.jar,junit-4.13.2.jar
JavaSelenium4CompilerLibraries=hamcrest-core-1.3.jar,junit-4.13.2.jar,selenium_bundle-4.12.1.jar,com.dkfqs.selenium.jar
JavaSelenium4TestExecutionLibraries=selenium_bundle-4.12.1.jar,com.dkfqs.selenium.jar,com.dkfqs.tools.jar,commons-io-2.13.0.jar,hamcrest-core-1.3.jar,junit-4.13.2.jar
Modify the twilio.properties file. Set the following properties:
- sid
- authToken
- fromTwilioPhoneNumber
Example: twilio.properties
apiURLMainPath=https://api.twilio.com/2010-04-01/Accounts/
sid=********************************
authToken=********************************
fromTwilioPhoneNumber=+1123456789
fromTwilioAlphanumericSenderID=RealLoad
tcpConnectTimoutMillis=10000
sslHandshakeTimeoutMillis=5000
httpProcessingTimeoutMillis=10000
debugAPI=false
First Test - Start the Portal Server manually (as dkfqs user)
cd /home/dkfqs/portal/bin
export CLASSPATH=bcpkix-jdk15on-160.jar:bcprov-jdk15on-160.jar:bctls-jdk15on-160.jar:DKFQS.jar
java -Xmx2048m -DdkfqsProperties=../config/dkfqs.properties -DrewriteProperties=../config/rewrite.properties -Dnashorn.args="--no-deprecation-warning" com.dkfqs.server.internal.StartDKFQSserver

Internal RSA 2048 bit keypair generated in 1220 ms
2021-03-10 22:27:25.040 | QAHTTPd | INFO | SQL connection pool for DB "UsersDB" initialized
2021-03-10 22:27:25.062 | QAHTTPd | INFO | SQL connection pool for DB "AdminAccountsDB" initialized
2021-03-10 22:27:25.068 | QAHTTPd | INFO | Alarm adapter "IP Blacklist Alarm Adapter" started
2021-03-10 22:27:25.069 | QAHTTPd | WARN | QAHTTPd V1.3-U started
2021-03-10 22:27:25.071 | QAHTTPd | INFO | Execute PreUpStartupLoadIPRangeBlacklist
2021-03-10 22:27:25.082 | QAHTTPd | INFO | HTTP server starting at port 8000
2021-03-10 22:27:25.109 | QAHTTPd | INFO | HTTP server ready at port 8000
2021-03-10 22:27:25.110 | QAHTTPd | INFO | HTTPS server starting at port 8001
2021-03-10 22:27:25.124 | QAHTTPd | INFO | HTTPS server ready at port 8001
2021-03-10 22:27:25.821 | EMAIL-1 | INFO | Email transmitter thread started
2021-03-10 22:27:25.822 | EMAIL-2 | INFO | Email transmitter thread started
2021-03-10 22:27:25.828 | main | INFO | Twilio SMS Gateway registered
2021-03-10 22:27:25.853 | main | INFO | Twilio SMS Gateway initialized
2021-03-10 22:27:25.857 | SMS-Dispatcher | INFO | Thread started
Create the Portal Server Startup Script (as root)
sudo bash # become root
cd /etc/init.d
vi DKFQS
Edit - create /etc/init.d/DKFQS
#!/bin/sh
# /etc/init.d/DKFQS
# install with: update-rc.d DKFQS defaults

### BEGIN INIT INFO
# Provides:          DKFQS
# Required-Start:    $local_fs $network $time $syslog
# Required-Stop:     $local_fs $network
# Default-Start:     2 3 4 5
# Default-Stop:      0 1 6
# Short-Description: Start DKFQS daemon at boot time
# Description:       DKFQS daemon
### END INIT INFO

case "$1" in
  start)
    if [ -f /home/dkfqs/portal/log/DKFQS.log ]; then
       mv /home/dkfqs/portal/log/DKFQS.log /home/dkfqs/portal/log/DKFQS.log_$(date +"%Y_%m_%d_%H_%M")
    fi
    sudo -H -u dkfqs bash -c 'CLASSPATH=/home/dkfqs/portal/bin/bcpkix-jdk15on-160.jar:/home/dkfqs/portal/bin/bcprov-jdk15on-160.jar:/home/dkfqs/portal/bin/bctls-jdk15on-160.jar:/home/dkfqs/portal/bin/jasperreports-fonts-6.20.5.jar:/home/dkfqs/portal/bin/DKFQS.jar;export CLASSPATH;cd /home/dkfqs/portal/temp;nohup java -Xmx3072m -DdkfqsProperties=/home/dkfqs/portal/config/dkfqs.properties -DrewriteProperties=/home/dkfqs/portal/config/rewrite.properties -Dnashorn.args="--no-deprecation-warning" com.dkfqs.server.internal.StartDKFQSserver 1>/home/dkfqs/portal/log/DKFQS.log 2>&1 &'
    ;;
  stop)
       PID=`ps -o pid,args -e | grep "StartDKFQSserver" | egrep -v grep | awk '{print $1}'`
       if [ ! -z "$PID" ] ; then
          echo "DKFQS stopped with pid(s) : $PID"
          kill -9 ${PID} 1> /dev/null 2>&1
       fi
    ;;
  status)
       PID=`ps -o pid,args -e | grep "StartDKFQSserver" | egrep -v grep | awk '{print $1}'`
       if [ ! -z "$PID" ] ; then
          echo "DKFQS running with pid(s) : $PID"
       else
          echo "No DKFQS running"
       fi
    ;;
  *)
    echo "Usage: /etc/init.d/DKFQS {start|stop|status}"
    exit 1
    ;;
esac

exit 0
Change owner and file protection of /etc/init.d/DKFQS (root at /etc/init.d):
chown root DKFQS
chgrp root DKFQS
chmod 755 DKFQS
Register /etc/init.d/DKFQS to be started at system boot (root at /etc/init.d):
update-rc.d DKFQS defaults
Reboot the system. Then check /home/dkfqs/portal/log/DKFQS.log
Administrator Sign In
Enter in your browser https://admin-portal-host/admin .
You will get a browser warning because the SSL server certificate is expired. Ignore the warning and enter
in the Sign In the email address and the password as you have set in CreateNewAdminDB.sql.
You will now asked to set a new password. Then you are signed in.
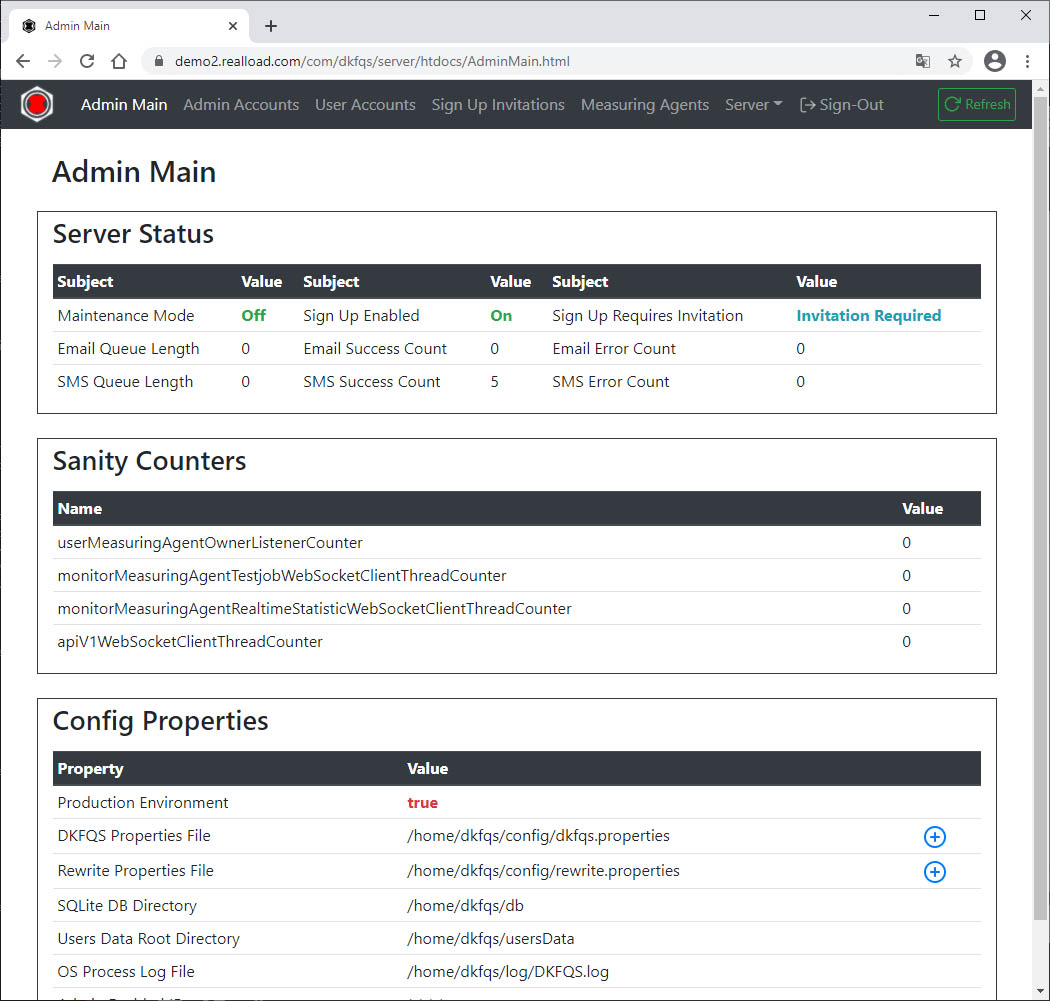
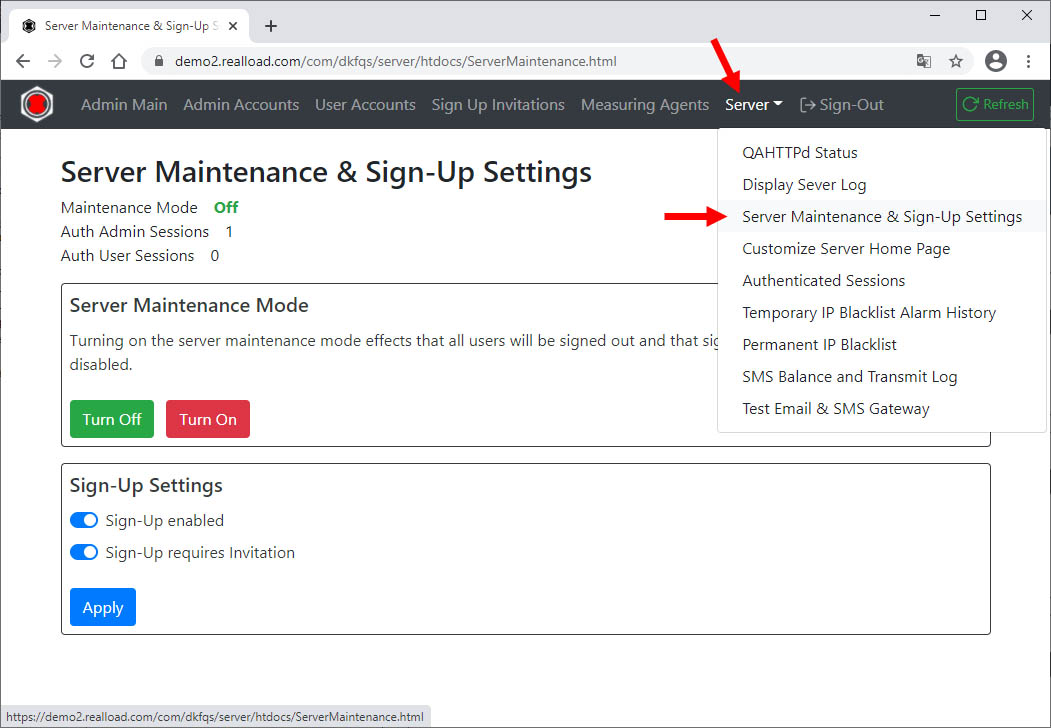
Disable Sign Up if you don’t have an SMS gateway:
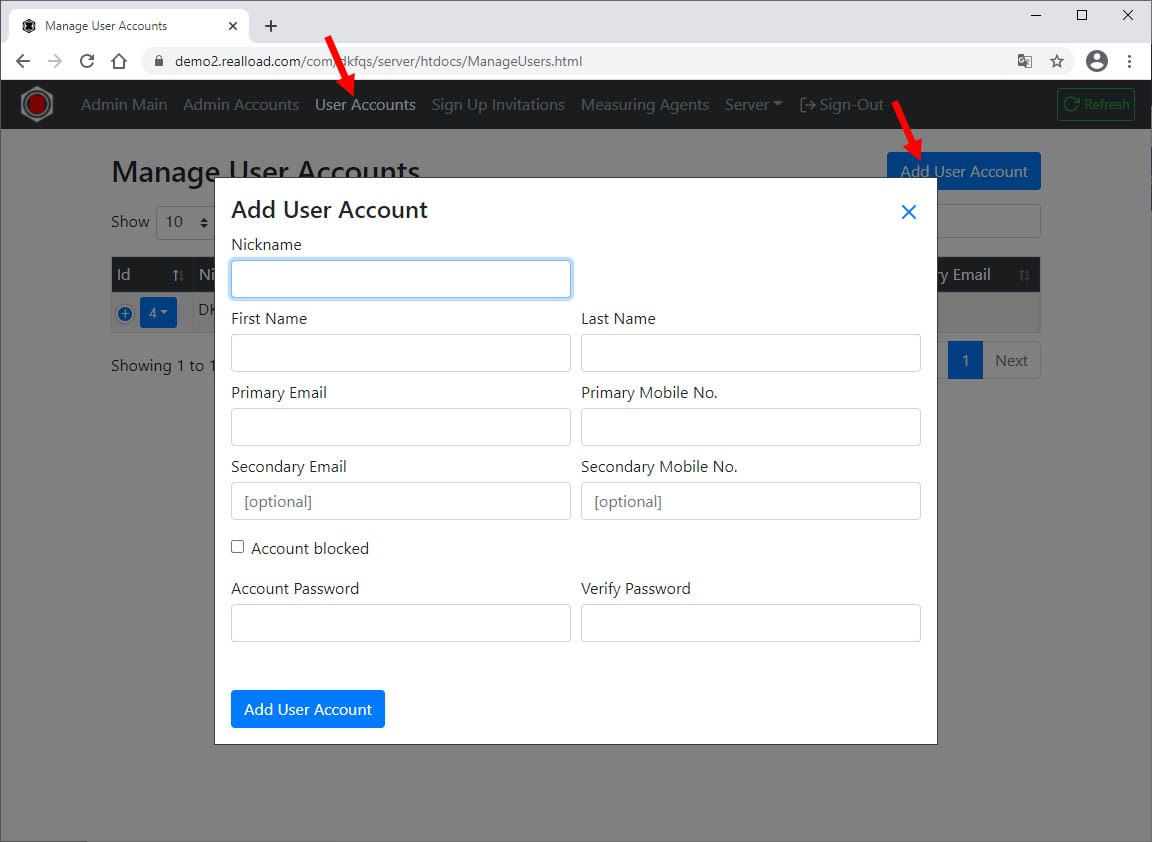
User accounts can be added directly:
Replace the SSL Server Certificate
If you or your company can already issue SSL server certificates you can skip the next sub-chapter.
Continue in such a case with “Convert and Install the SSL Server Certificate”.
Get a Let's Encrypt SSL Server Certificate | Ubuntu 20
Make sure that your portal server has a public, valid DNS name.
Install certbot:
sudo snap install --classic certbot
sudo ln -s /snap/bin/certbot /usr/bin/certbot
Stop the Portal Server:
sudo /etc/init.d/DKFQS stop
To get the SSL server certificate enter:
sudo certbot certonly --standalone # enter your email address and the DNS name ou your portal server, follow the instructions
On success certbot generates the following two files:
- fullchain.pem
- privkey.pem
Start the Portal Server:
sudo /etc/init.d/DKFQS start
Convert and Install the SSL Server Certificate
Become root and navigate to the directory where the fullchain.pem and privkey.pem files are located. Enter:
sudo bash
openssl pkcs12 -export -in fullchain.pem -inkey privkey.pem -out your-certificate-name.p12  # convert cert to PKCS12 file
keytool -importkeystore -srckeystore your-certificate-name.p12 -srcstoretype PKCS12 -destkeystore your-certificate-name.jks -deststoretype JKS  # convert PKCS12 file to Java keystore file
Copy the Java keystore file to /home/dkfqs/portal/jks
cp your-certificate-name.jks /home/dkfqs/portal/jks
Edit /home/dkfqs/portal/config/dkfqs.properties and replace:
HTTPSKeyStoreFile=/home/dkfqs/portal/jks/your-certificate-name.jks
HTTPSKeyStorePassword=*********
Restart the Portal Server
sudo /etc/init.d/DKFQS stop
sudo /etc/init.d/DKFQS start
Create a Cron Job to Renew the Let's Encrypt SSL Certificate
Create at your home directory the sub-directory system_cronjobs_scripts and add/edit the file “DKFQS_certbot_renew” in this directory. Replace the ********* placeholders with your real values.
#!/bin/sh
#
# renew the letsencrypt DKFQS certificate
# =======================================
certbot renew
#
# set the default working directory
cd /home/*********/system_cronjobs_scripts
#
# cleanup in any case
rm -f *.jks
rm -f *.p12
#
# convert the letsencrypt certificate to PKCS12 and place it in the default directory
openssl pkcs12 -export -in /etc/letsencrypt/live/*********/fullchain.pem -inkey /etc/letsencrypt/live/*********/privkey.pem -out ./*********.p12 -passin pass:******** -passout pass:********
#
# convert the PKCS12 certificate to a Java keystore
echo ******** | keytool -importkeystore -srckeystore *********.p12 -srcstoretype PKCS12 -destkeystore *********.jks -deststoretype JKS -storepass ********
#
# update DKFQS keystore file
cp *********.jks /home/dkfqs/portal/jks
chown dkfqs /home/dkfqs/portal/jks/*********.jks
chgrp dkfqs /home/dkfqs/portal/jks/*********.jks
chmod 600 /home/dkfqs/portal/jks/*********.jks
#
# restart DKFQS server
/etc/init.d/DKFQS stop
sleep 5
sudo /etc/init.d/DKFQS start
#
# cleanup again in any case
rm -f *.jks
rm -f *.p12
#
# display DKFQS log file
sleep 5
cat /home/dkfqs/portal/log/DKFQS.log
#
# all done
exit 0
sudo bash # become root
chmod 700 DKFQS_certbot_renew # change file protection and set execute bit
./DKFQS_certbot_renew  # try out manually
Add the file to crontab. Important: The last line in crontab must be an empty line!
1 1 1 * * /home/*********/system_cronjobs_scripts/DKFQS_certbot_renew > /home/*********/system_cronjobs_scripts/DKFQS_certbot_renew.log 2>&1
4 - Ubuntu: Remote Proxy Recorder manual install
Ubuntu: Remote Proxy Recorder Install Instructions
Prerequisites
Supported Hardware
- Amazon EC2 Cloud instance, or
- Own hosted server with any Intel or AMD CPU
Minimum Requirements
- Minimum required CPU Cores of Processor: 2
- Minimum required Memory: 8 GB
- Minimum required Disk: 32 GB
- Minimum required Network Speed: 100 Mbps (1000 Mbps or faster strongly recommended)
Environment and Location
The Remote Proxy Recorder can be placed at any network location, but the control port must be reachable from the Portal Server.
Network & System Tuning
In /etc/sysctl.conf add:
# TCP/IP Tuning
# =============
fs.file-max = 524288
net.ipv4.tcp_max_syn_backlog = 2048
net.ipv4.tcp_synack_retries = 3
net.ipv4.tcp_max_orphans = 65536
net.ipv4.tcp_fin_timeout = 30
net.ipv4.ip_local_port_range = 16384 60999
net.core.somaxconn = 256
net.core.rmem_max = 1048576
net.core.wmem_max = 1048576
in /etc/security/limits.conf add:
# TCP/IP Tuning
# =============
* soft     nproc          262140
* hard     nproc          262140
* soft     nofile         262140
* hard     nofile         262140
root soft     nproc          262140
root hard     nproc          262140
root soft     nofile         262140
root hard     nofile         262140
Enter:
systemctl show -p TasksMax user-0
output: TasksMax=8966
if you get a value less than 262140 then add in /etc/systemd/system.conf
# Ubuntu Tuning
# =============
DefaultTasksMax=262140
Reboot the system and verify the settings.
Enter: ulimit -n
output: 262140
Enter: systemctl show -p TasksMax user-0
output: TasksMax=262140
Install Dependencies
Install haveged
sudo apt-get update
sudo apt-get install haveged
Install OpenJDK 11
Get the Java Installation Kit
wget https://download.java.net/java/GA/jdk11/13/GPL/openjdk-11.0.1_linux-x64_bin.tar.gz
Install OpenJDK Java 11
gunzip openjdk-11.0.1_linux-x64_bin.tar.gz
tar -xvf openjdk-11.0.1_linux-x64_bin.tar
rm openjdk-11.0.1_linux-x64_bin.tar
sudo bash
mv jdk-11.0.1 /opt/OpenJDK
cd /opt/OpenJDK
ls -al
chown root -R jdk-11.0.1
chgrp root -R jdk-11.0.1
Execute the following commands (still as sudo bash):
update-alternatives --install "/usr/bin/java" "java" "/opt/OpenJDK/jdk-11.0.1/bin/java" 1
update-alternatives --install "/usr/bin/javac" "javac" "/opt/OpenJDK/jdk-11.0.1/bin/javac" 1
update-alternatives --install "/usr/bin/keytool" "keytool" "/opt/OpenJDK/jdk-11.0.1/bin/keytool" 1
update-alternatives --install "/usr/bin/jar" "jar" "/opt/OpenJDK/jdk-11.0.1/bin/jar" 1
update-alternatives --set "java" "/opt/OpenJDK/jdk-11.0.1/bin/java"
update-alternatives --set "javac" "/opt/OpenJDK/jdk-11.0.1/bin/javac"
update-alternatives --set "keytool" "/opt/OpenJDK/jdk-11.0.1/bin/keytool"
update-alternatives --set "jar" "/opt/OpenJDK/jdk-11.0.1/bin/jar"
exit # end sudo bash
Verify the Java 11 installation.
java -version

openjdk version "11.0.1" 2018-10-16
OpenJDK Runtime Environment 18.9 (build 11.0.1+13)
OpenJDK 64-Bit Server VM 18.9 (build 11.0.1+13, mixed mode)
Generate the Certificate Authority (CA) Root Certificate
For technical reasons, the Remote Proxy Recorder generates “fake” web server certificates during operation in order to break the encryption between the web browser and the web servers and to record the data exchanged.
In order for this to work, the Remote Proxy Recorder needs its own CA root certificate, which you then have to import into your browser.
Thus for security reasons, never use a CA root certificate from us or someone else for the Remote Proxy Recorder root certificate. Always create your own CA root certificate.
Example:
C:\Scratch2>openssl genrsa -des3 -out myCAPrivate.key 2048
Generating RSA private key, 2048 bit long modulus
.......................+++
.............................+++
unable to write 'random state'
e is 65537 (0x10001)
Enter pass phrase for myCAPrivate.key:
Verifying - Enter pass phrase for myCAPrivate.key:

C:\Scratch2>openssl pkcs8 -topk8 -inform PEM -outform PEM -in myCAPrivate.key -out myCAPrivateKey.pem -nocrypt
Enter pass phrase for myCAPrivate.key:

C:\Scratch2>openssl req -x509 -new -nodes -key myCAPrivate.key -sha256 -days 3700 -out myCARootCert.pem
Enter pass phrase for myCAPrivate.key:
You are about to be asked to enter information that will be incorporated
into your certificate request.
What you are about to enter is what is called a Distinguished Name or a DN.
There are quite a few fields but you can leave some blank
For some fields there will be a default value,
If you enter '.', the field will be left blank.
-----
Country Name (2 letter code) [AU]:CH
State or Province Name (full name) [Some-State]:Bern
Locality Name (eg, city) []:Bern
Organization Name (eg, company) [Internet Widgits Pty Ltd]:My Pty Ltd
Organizational Unit Name (eg, section) []:QA
Common Name (e.g. server FQDN or YOUR name) []:DKFQS Proxy Recorder Root
Email Address []:

C:\Scratch2>dir
 Volume in drive C is OS
 Volume Serial Number is AEF7-CFB1

 Directory of C:\Scratch2

06 Feb 2022  20:44    <DIR>          .
06 Feb 2022  20:44    <DIR>          ..
06 Feb 2022  20:40             1.743 myCAPrivate.key
06 Feb 2022  20:41             1.704 myCAPrivateKey.pem
06 Feb 2022  20:44             1.350 myCARootCert.pem
               3 File(s)          4.797 bytes
               2 Dir(s)  310.772.580.352 bytes free
Install the Remote Proxy Recorder
Create the DKFQS account which is running the Remote Proxy Recorder
sudo adduser dkfqs # follow the questions, remember or write down the password
Install the Remote Proxy Recorder
Login with the dkfqs account (SSH) - or - Enter: sudo -u dkfqs bash |
OR: Install Samba to get convenient access to /home/dkfqs as Samba dkfqs user
Create the directory /home/dkfqs/proxy (as dkfqs user):
cd /home/dkfqs
mkdir proxy
Create the following sub-directories at /home/dkfqs/proxy (as dkfqs user):
cd /home/dkfqs/proxy
mkdir bin config log
Copy the following files to the bin directory /home/dkfqs/proxy/bin
- bcmail-jdk15on-168.jar
- bcpg-jdk15on-168.jar
- bcpkix-jdk15on-168.jar
- bcprov-jdk15on-168.jar
- bctls-jdk15on-168.jar
- com.dkfqs.remoteproxyrecorder.jar
Copy the following files to the config directory /home/dkfqs/proxy/config
- config.properties
- myCAPrivateKey.pem (the private key of your self generated CA root certificate)
- myCARootCert.pem (your self generated CA root certificate)
Modify the config.properties file. Set (modify) the following properties:
- ControlServerHttpsCertificateCN (set the public DNS name or the IP address of the Remote Proxy Recorder)
- ControlServerHttpsCertificateIP (set the public IP address of the Remote Proxy Recorder)
- ControlServerAuthToken
- ProxyServerDefaultCaRootCertFilePath (set the CA root certificate of the proxy)
- ProxyServerDefaultCaRootPrivateKeyFilePath (set the private key of the CA root certificate)
Example: config.properties
ControlServerLogLevel=info
ControlServerHttpsPort=8081
ControlServerHttpsCertificateCN=proxy2.realload.com
ControlServerHttpsCertificateIP=83.150.39.45
#Note: the control server authentication token is required to connect to the control server
ControlServerAuthToken=krungthep

ProxyServerLogLevel=warn
ProxyServerPort=8082
ProxyServerDefaultCaRootCertFilePath=/home/dkfqs/proxy/config/myCARootCert.pem
ProxyServerDefaultCaRootPrivateKeyFilePath=/home/dkfqs/proxy/config/myCAPrivateKey.pem
#Note: the proxy authentication credentials are replaced on the fly when the portal user connects via the control interface to the control server
ProxyServerDefaultAuthenticationUsername=max
ProxyServerDefaultAuthenticationPassword=meier
First Test - Start the Remote Proxy Recorder manually (as dkfqs user)
cd /home/dkfqs/proxy/bin
export CLASSPATH=bcmail-jdk15on-168.jar:bcpg-jdk15on-168.jar:bcpkix-jdk15on-168.jar:bcprov-jdk15on-168.jar:bctls-jdk15on-168.jar:com.dkfqs.remoteproxyrecorder.jar
java -Xmx2048m -DconfigProperties=../config/config.properties -Dnashorn.args="--no-deprecation-warning" com.dkfqs.remoteproxyrecorder.main.StartRemoteProxyRecorder

> Remote Proxy Recorder V0.2.0
> Max. Memory = 2048 MB
> Internal RSA 2048 bit keypair generated in 85 ms
> 2021-06-05 23:24:37.710 | QAHTTPd | WARN | QAHTTPd V1.3-V started
> 2021-06-05 23:24:37.710 | QAHTTPd | INFO | HTTPS server starting at port 8081
> 2021-06-05 23:24:37.726 | QAHTTPd | INFO | HTTPS server ready at port 8081
> 2021-06-05 23:24:38.722 | Proxy | WARN | ProxyRecorder V1.1.0 started at port 8082
Create the Remote Proxy Recorder Startup Script (as root)
sudo bash # become root
cd /etc/init.d
vi RemoteProxyRecorder
Edit - create /etc/init.d/RemoteProxyRecorder
#!/bin/sh
# /etc/init.d/RemoteProxyRecorder
# install with: update-rc.d RemoteProxyRecorder defaults

### BEGIN INIT INFO
# Provides:          RemoteProxyRecorder
# Required-Start:    $local_fs $network $time $syslog
# Required-Stop:     $local_fs $network
# Default-Start:     2 3 4 5
# Default-Stop:      0 1 6
# Short-Description: Start RemoteProxyRecorder daemon at boot time
# Description:       RemoteProxyRecorder daemon
### END INIT INFO

case "$1" in
  start)
    if [ -f /home/dkfqs/proxy/log/RemoteProxyRecorder.log ]; then
       mv /home/dkfqs/proxy/log/RemoteProxyRecorder.log /home/dkfqs/proxy/log/RemoteProxyRecorder.log_$(date +"%Y_%m_%d_%H_%M")
    fi
    sudo -H -u dkfqs bash -c 'CLASSPATH=/home/dkfqs/proxy/bin/bcmail-jdk15on-168.jar:/home/dkfqs/proxy/bin/bcpg-jdk15on-168.jar:/home/dkfqs/proxy/bin/bcpkix-jdk15on-168.jar:/home/dkfqs/proxy/bin/bcprov-jdk15on-168.jar:/home/dkfqs/proxy/bin/bctls-jdk15on-168.jar:/home/dkfqs/proxy/bin/com.dkfqs.remoteproxyrecorder.jar;export CLASSPATH;nohup java -Xmx4096m -DconfigProperties=/home/dkfqs/proxy/config/config.properties -Dnashorn.args="--no-deprecation-warning" com.dkfqs.remoteproxyrecorder.main.StartRemoteProxyRecorder 1>/home/dkfqs/proxy/log/RemoteProxyRecorder.log 2>&1 &'
    ;;
  stop)
       PID=`ps -o pid,args -e | grep "StartRemoteProxyRecorder" | egrep -v grep | awk '{print $1}'`
       if [ ! -z "$PID" ] ; then
          echo "RemoteProxyRecorder stopped with pid(s) : $PID"
          kill -9 ${PID} 1> /dev/null 2>&1
       fi
    ;;
  status)
       PID=`ps -o pid,args -e | grep "StartRemoteProxyRecorder" | egrep -v grep | awk '{print $1}'`
       if [ ! -z "$PID" ] ; then
          echo "RemoteProxyRecorder running with pid(s) : $PID"
       else
          echo "No RemoteProxyRecorder running"
       fi
    ;;
  *)
    echo "Usage: /etc/init.d/RemoteProxyRecorder {start|stop|status}"
    exit 1
    ;;
esac

exit 0
Change owner and file protection of /etc/init.d/RemoteProxyRecorder (root at /etc/init.d):
chown root RemoteProxyRecorder
chgrp root RemoteProxyRecorder
chmod 755 RemoteProxyRecorder
Register /etc/init.d/RemoteProxyRecorder to be started at system boot (root at /etc/init.d):
update-rc.d RemoteProxyRecorder defaults
Reboot the system. Login as dkfqs and check /home/dkfqs/proxy/log/RemoteProxyRecorder.log
Register and Verify the Remote Proxy Recorder
- Sign-in at the ‘Portal Server’
- Follow the instructions at User Guide
5 - Centos 8 Portal Server manual install
Centos 8 Portal Server manual install instructions
Prepare your system
Install Centos 8 minimal server.
Disable SELinux in /etc/selinux/config
Network & System Tuning
Open ports 443 and 80 on firewall:
firewall-cmd --zone=public --add-service=http
firewall-cmd --zone=public --add-service=https
firewall-cmd --zone=public --permanent --add-service=http
firewall-cmd --zone=public --permanent --add-service=https
firewall-cmd --reload
In /etc/sysctl.conf add:
# TCP/IP Tuning
# =============
fs.file-max = 524288
net.ipv4.tcp_max_syn_backlog = 2048
net.ipv4.tcp_synack_retries = 3
net.ipv4.tcp_max_orphans = 65536
net.ipv4.tcp_fin_timeout = 30
net.ipv4.ip_local_port_range = 16384 60999
net.core.somaxconn = 256
net.core.rmem_max = 1048576
net.core.wmem_max = 1048576
in /etc/security/limits.conf add:
# TCP/IP Tuning
# =============
* soft     nproc          262140
* hard     nproc          262140
* soft     nofile         262140
* hard     nofile         262140
root soft     nproc          262140
root hard     nproc          262140
root soft     nofile         262140
root hard     nofile         262140
Reboot system and check with ulimit -n :
The output should be 262140
Install dependencies
Install SQLite
sudo yum update
yum install sqlite
Install haveged
yum -y install epel-release
yum repolist
yum install haveged
yum install unzip
yum install tar
Install JDKs (As root)
Download OpenJDK 11 and 8 (TODO: URLs) and then:
cd /opt/OpenJDK
tar xzvf openjdk-11.0.1_linux-x64_bin.tar.gz
update-alternatives --install "/usr/bin/java" "java" "/opt/OpenJDK/jdk-11.0.1/bin/java" 1
update-alternatives --install "/usr/bin/javac" "javac" "/opt/OpenJDK/jdk-11.0.1/bin/javac" 1
update-alternatives --install "/usr/bin/keytool" "keytool" "/opt/OpenJDK/jdk-11.0.1/bin/keytool" 1
update-alternatives --install "/usr/bin/jar" "jar" "/opt/OpenJDK/jdk-11.0.1/bin/jar" 1
update-alternatives --set "java" "/opt/OpenJDK/jdk-11.0.1/bin/java"
update-alternatives --set "javac" "/opt/OpenJDK/jdk-11.0.1/bin/javac"
update-alternatives --set "keytool" "/opt/OpenJDK/jdk-11.0.1/bin/keytool"
update-alternatives --set "jar" "/opt/OpenJDK/jdk-11.0.1/bin/jar"

tar xzvf openjdk-8u41-b04-linux-x64-14_jan_2020.tar.gz
Java installation validation steps
java -version
openjdk version "11.0.1" 2018-10-16/

opt/OpenJDK/java-se-8u41-ri/bin/java -version
openjdk version "1.8.0_41"
Install Real Load
Create the DKFQS account
sudo adduser -m dkfqs

su - dkfqs
cd /home/dkfqs
mkdir portal
cd /home/dkfqs/portal
mkdir backup bin config db htdocs jks log scripts usersLib usersData
Copy various files into place
cp /opt/install_sw/Common/*.jar /home/dkfqs/portal/bin/
cp /opt/install_sw/V4.2.11/PortalServer/bin/DKFQS.jar /home/dkfqs/portal/bin/
cp /opt/install_sw/V4.2.11/PortalServer/config/* /home/dkfqs/portal/config/
Copy the htdocs.jar file to the htdocs directory /home/dkfqs/portal/htdocs
Navigate to /home/dkfqs/portal/htdocs and un-jar the file:
jar -xvf htdocs.jar
rm htdocs.jar  (and delete the jar)
rm -R META-INF (delete the META-INF directory)
Create SQLite DBs
Copy the following files to the db directory /home/dkfqs/portal/db
- CreateNewAdminDB.sql
- CreateNewOperationsDB.sql
- CreateNewUsersDB.sql
Login with the dkfqs account, navigate to /home/dkfqs/portal/db and create the Admin, Operations and the Users DB:
sqlite3 AdminAccounts.db < CreateNewAdminDB.sql
sqlite3 Operations.db < CreateNewOperationsDB.sql
sqlite3 Users.db < CreateNewUsersDB.sql
Allow privileged port binding
Allow un-privileged accounts to bind to privileged ports (80, 443)
sysctl net.ipv4.ip_unprivileged_port_start=0
Create services
Create the /home/dkfqs/portal/bin/portal.sh file:
#!/usr/bin/bash
case "$1" in
start)
if [ -f /home/dkfqs/portal/log/DKFQS.log ]; then
mv /home/dkfqs/portal/log/DKFQS.log /home/dkfqs/portal/log/DKFQS.log_$(date +"%Y_%m_%d_%H_%M")
fi
CLASSPATH=/home/dkfqs/portal/bin/bcpkix-jdk15on-160.jar:/home/dkfqs/portal/bin/bcprov-jdk15on-160.jar:/home/dkfqs/portal/bin/bctls-jdk15on-160.jar:/home/dkfqs/portal/bin/DKFQS.jar;export CLASSPATH;nohup java -Xmx2048m -DdkfqsProperties=/home/dkfqs/portal/config/dkfqs.properties -DrewriteProperties=/hom
e/dkfqs/portal/config/rewrite.properties -Dnashorn.args="--no-deprecation-warning" com.dkfqs.server.internal.StartDKFQSserver 1>/home/dkfqs/portal/log/DKFQS.log 2>&1 &
;;
stop)
PID=`ps -o pid,args -e | grep "StartDKFQSserver" | egrep -v grep | awk '{print $1}'`
if [ ! -z "$PID" ] ; then
echo "DKFQS stopped with pid(s) : $PID"
kill -9 ${PID} 1> /dev/null 2>&1
fi
;;
status)
PID=`ps -o pid,args -e | grep "StartDKFQSserver" | egrep -v grep | awk '{print $1}'`
if [ ! -z "$PID" ] ; then
echo "DKFQS running with pid(s) : $PID"
else
echo "No DKFQS running"
fi
;;
*)
echo "Usage: /etc/init.d/DKFQS {start|stop|status}"
exit 1
;;
esac
exit 0
Create the unit file
Create the file /etc/systemd/system/DKFQSPortal.service with the below content:
[Unit]
Description=DKFQS portal
After=network.target

[Service]
User=dkfqs
Group=dkfqs
Type=simple
RemainAfterExit=yes
ExecStart=/home/dkfqs/portal/bin/portal.sh start
ExecStop=/home/dkfqs/portal/bin/portal.sh stop
TimeoutStartSec=0

[Install]
WantedBy=default.target
Start the services
systemctl daemon-reload
systemctl enable DKFQSPortal.service
systemctl start DKFQSPortal.service
journalctl -ex (... to check that no errors occured..)


