HTTP Test Wizard

Overview and Functionality
The HTTP Tests Wizard supports you to create sophisticated tests in an easy way. You can:
- Compile (define) the Entire Test via the User Interface
- or Post-Edit a Recorded Web Surfing Session
As the name suggests, the HTTP Tests Wizard is optimized for the execution of HTTP/S tests. However, by using HTTP Tests Wizard Plug-Ins, any other protocols can also be tested and measured (similar to JUnit Tests).
HTTP Tests Wizard Features:
- No programming required (except for self written plug-ins). You can create your test through the powerful user interface by assembling all required functionalities via simple dialogs.
- Variables can be defined and their values can be extracted and assigned directly via the user interface.
- A powerful debugger helps you to perfect your test.
- The defined test can be automatically converted into a performance-optimized RealLoad Test.
Background Information on the Technical Concept
The HTTP Test Wizard works on a purely abstract level, in that you only define high-level instructions in the user interface about what will be executed later during the test. This also includes the remote debugger, which only executes the (codeless defined) instructions entered. After successful verification of a defined test using the debugger, a HTTP Tests Wizard ‘Session’ can be automatically converted into a performance-optimized RealLoad Test that is ready out of the box without the need for any manual programming.Session and Session Elements
The test sequence is referred to as a so-called “Session”, whereby each simulated user repeatedly executes the session in a loop (so called “User Session” or “Session Loop”).
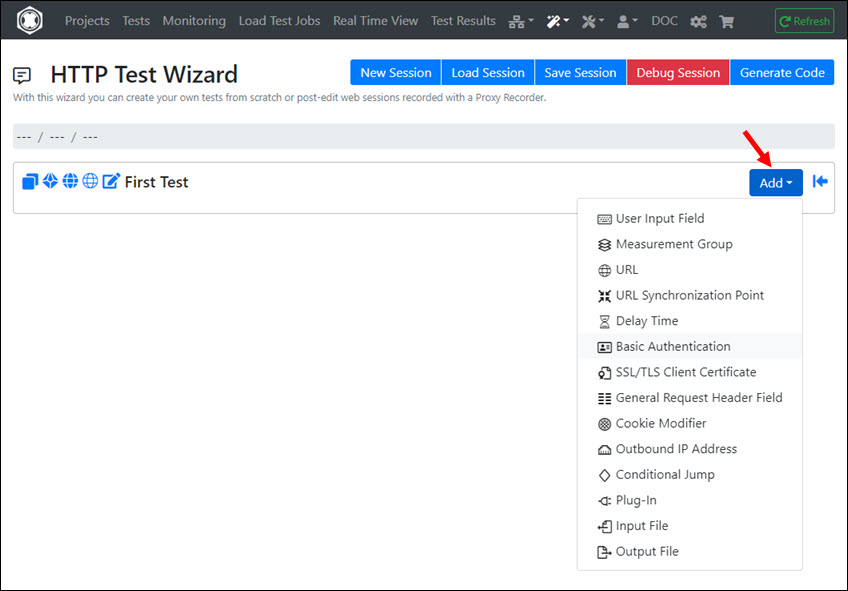
In order to define a test sequence, you can add various Session Elements to a session:
- User Input Field : An additional input field whose value can be entered when starting the test and that is defined as a global variable during the test.
- Measurement Group : Measures the execution time over several session elements.
- URL : Executes an HTTP request and receives and verifies the HTTP response. The URL can executed either synchronously or in parallel with other URLs. (see also URL Synchronisation Point). One or more “Bound to URL Plug-Ins” can also be added to a URL which, among other things, can modify the HTTP request and post-process the HTTP response.
- URL Synchronisation Point : Synchronizes URLs executed in parallel (waits until the last HTTP response has received).
- Delay Time : Delays the execution of the user session for an amount of time.
- Basic Authentication : Adds a Basic Authentication username and password to the URLs, for all Web servers or for a specific Web server.
- SSL/TLS Client Certificate : Adds SSL Client Certificate(s) in PKCS12 format for a specific HTTPS server.
- General Request Header Field : Adds a HTTP request header field (for example “User-Agent”) to the URLs, for all Web servers or for a specific Web server.
- Cookie Modifier : Sets/Extracts/Deletes HTTP cookies.
- Outbound IP Address : Supports to use multiple outbound IP addresses on Measuring Agent(s) when executing the test.
- Conditional Jump : Performs a conditional jump (conditional GoTo) to any other session element.
- Plug-In : Executes a “Normal Session Element Plug-In”.
- Input File : Reads an input file line by line, tokenizes each line and extracts the values of the tokens into variables.
- Output File : Stores the values of variables into an output file.
Position of an Added Session Element
If an (existing) session element is selected, the new session element is inserted after it. Or if no session element is selected, the new session element will be added at the end of the session.
Copy / Cut / Paste and Delete of a Single Session Element
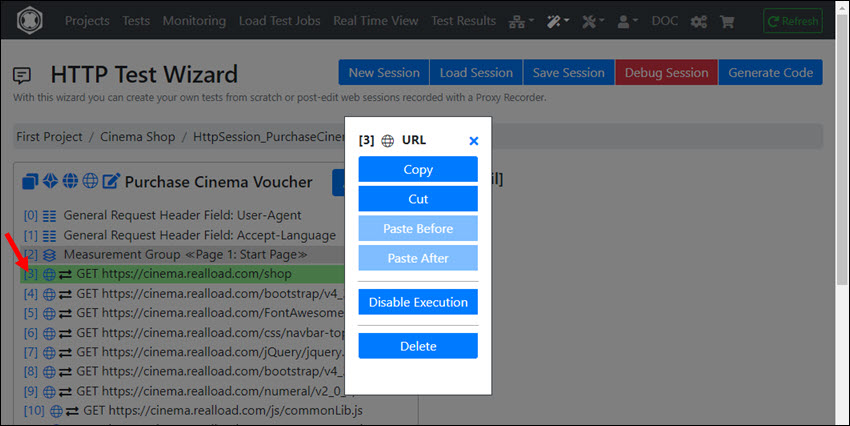
By clicking on the index of a session element, you can copy, cut, paste, and delete it. You can also disable and re-enable the execution of the session element.
Copy / Cut / Paste and Delete of Multiple Session Elements
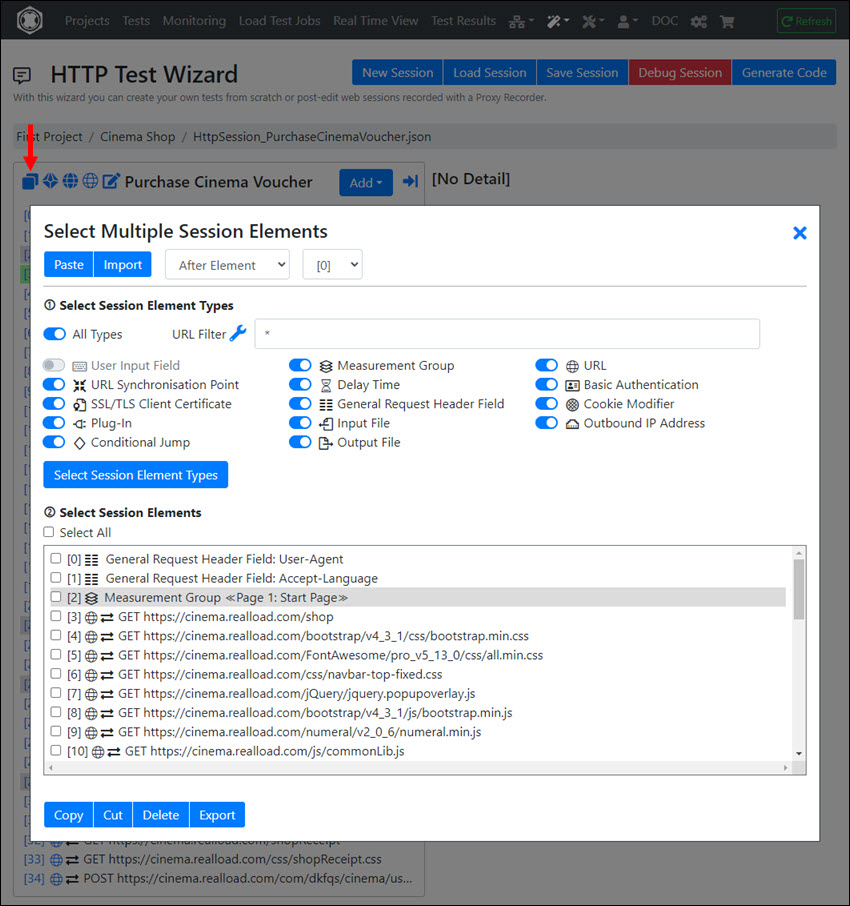
By clicking on the ‘Select Multiple Session Elements’ icon, you can copy, cut, paste, and delete multiple session elements:
Displaying and Defining Variables
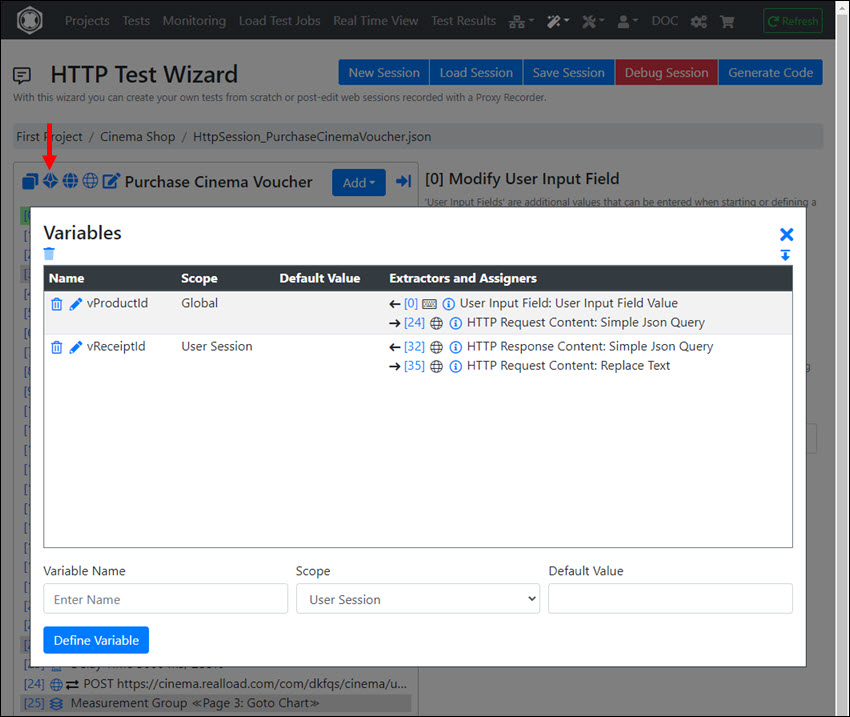
By clicking on the ‘Variables’ icon the list of all variables is shown. Here you can also define new variables and modify their scope and default value. Furthermore all extractors and assigners for each variable are displayed:
Scopes of Variables
A variable can have the following Scope:
- Global : There is only one instance of this variable during test execution. Such a variable is visible across all simulated users and their session loops. The initial (default) value is assigned at the start of the test.
- User : There are as many (different) instances of this variable as there are users simulated during a test - this means that each simulated user has its own instance. Such a variable is visible across all session loops of the simulated user. The initial (default) value is assigned when the simulated user starts.
- User Session : For each session loop of a user, a new instance of the variable is created, which is only valid and visible during the corresponding session loop. The initial (default) value is assigned at the start of each session loop of a user.
Extractors and Assigners for Variables
- A Variable Extractor defines how the value of a variable is extracted from a session element. The value is typically extracted from an HTTP response of a URL, or from a User Input Field, or from an Input File. Values can also be extracted from many other session elements, such as from HTTP Cookies or from Plug-Ins.
- A Variable Assigner defines how the value of a variable is assigned to a session element. The value is typically assigned to an HTTP request of a URL, but can also be assigned to many other session elements, such as to Plug-Ins or to HTTP Cookies.
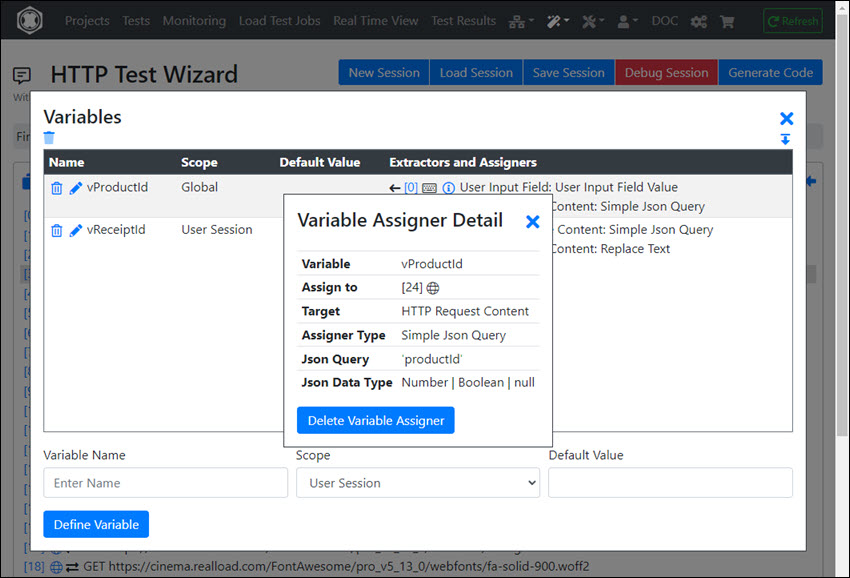
See also Handling of Dynamic Session Values.
URL Explorer
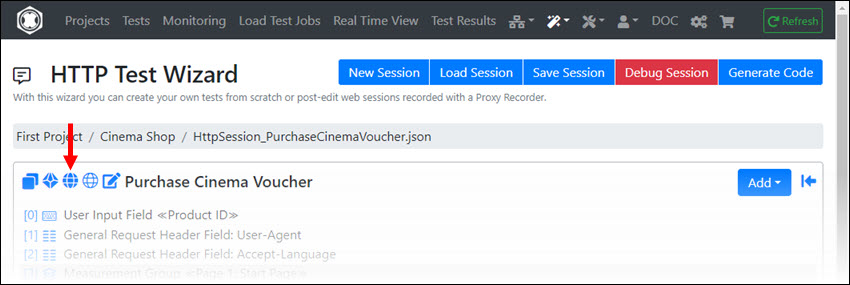
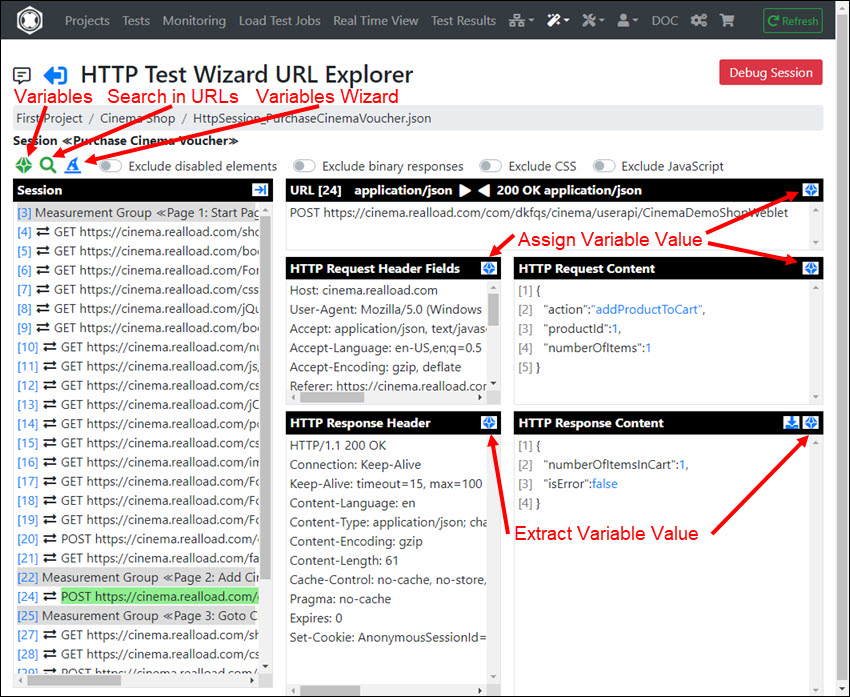
With the URL Explorer you can view and search the HTTP data of the URLs, and also post-edit (extract and assign) dynamic session values.
Post-Editing Recorded Sessions
See Handling of Dynamic Session Values.
Post-Editing Manually Entered Sessions
If you entered the session manually (i.e. did not record it with a proxy recorder), the HTTP data for the URLs will be empty because they are currently unknown. However, you can use the debugger and handle dynamic session values directly in the debugger:
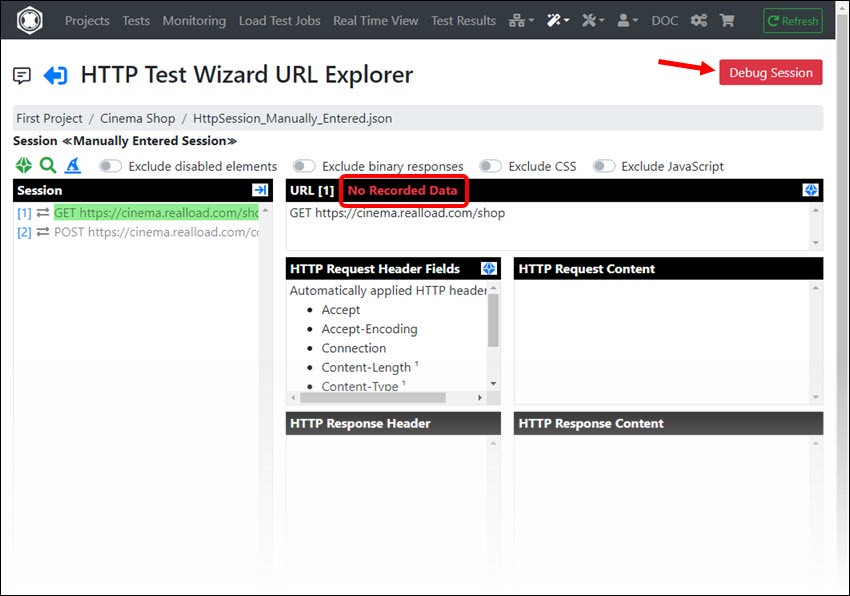
All definitions regarding variables that you make in the debugger are transferred directly to the HTTP Test Wizard session.
There is another option in the debugger where you can transfer the HTTP data from the URLs into the URL Explorer by clicking on each executed URL at the HTTP response to the ‘Set/Update Recorded URL’ icon:
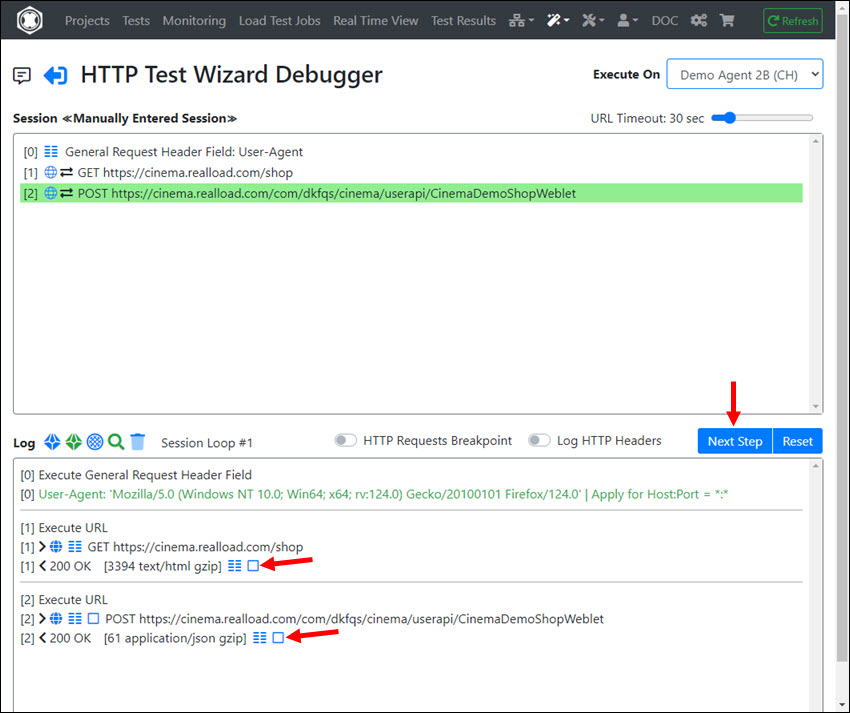
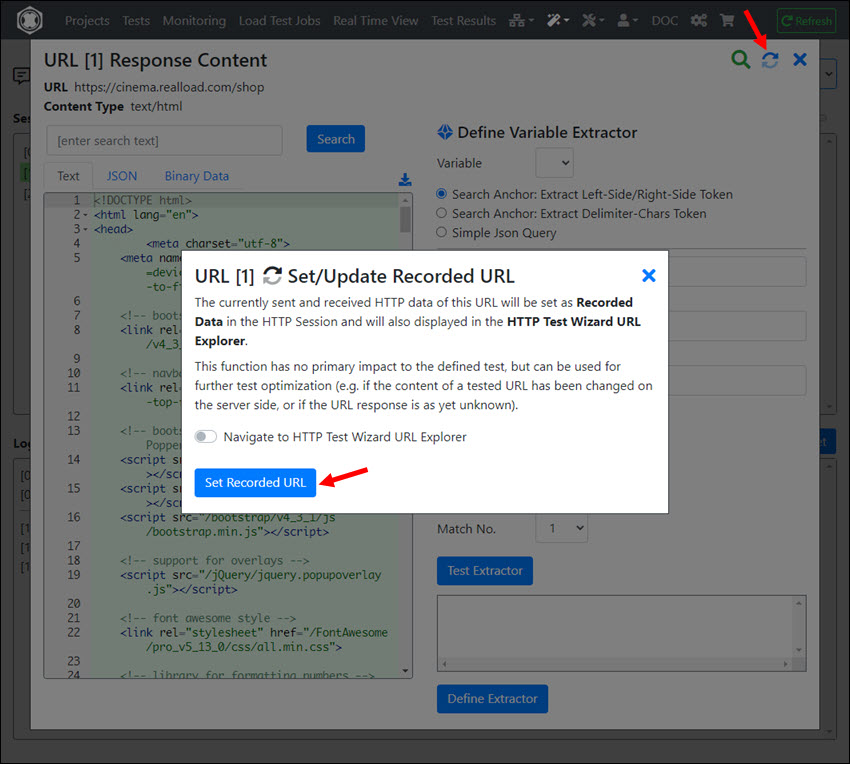
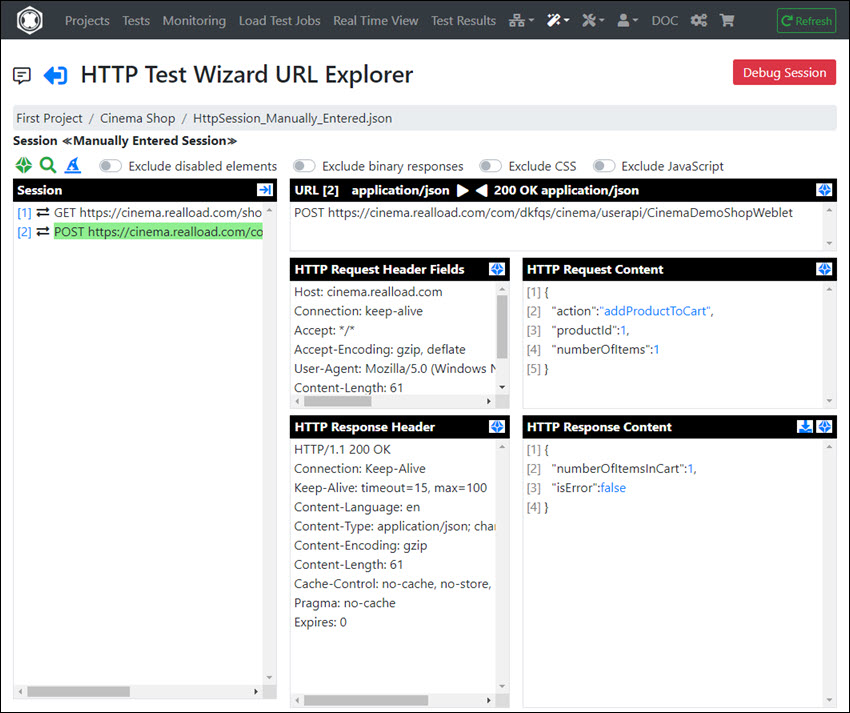
Afterwards it will look something like this in the URL Explorer and you can continue as described at Handling of Dynamic Session Values.
Reviewing and Editing multiple URLs
After you’ve finished post-editing the session - and the session is working with the debugger - you should take a look at the content verification of the HTTP responses of all URLs. For example, maybe you forgot to verify the HTTP response status code for some URLs. For this purpose invoke the ‘Review and Edit URL Settings’ wizard:
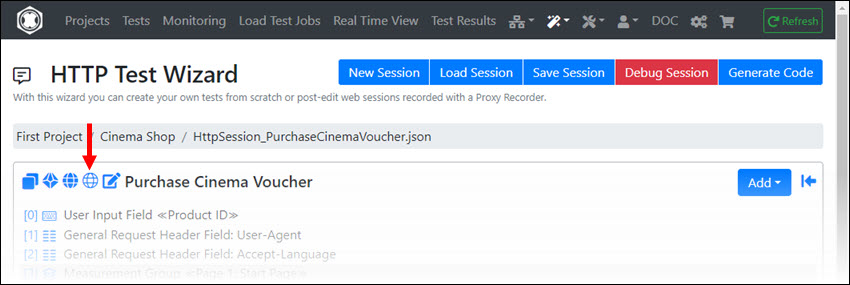
You can also select several URLs here and edit them together:
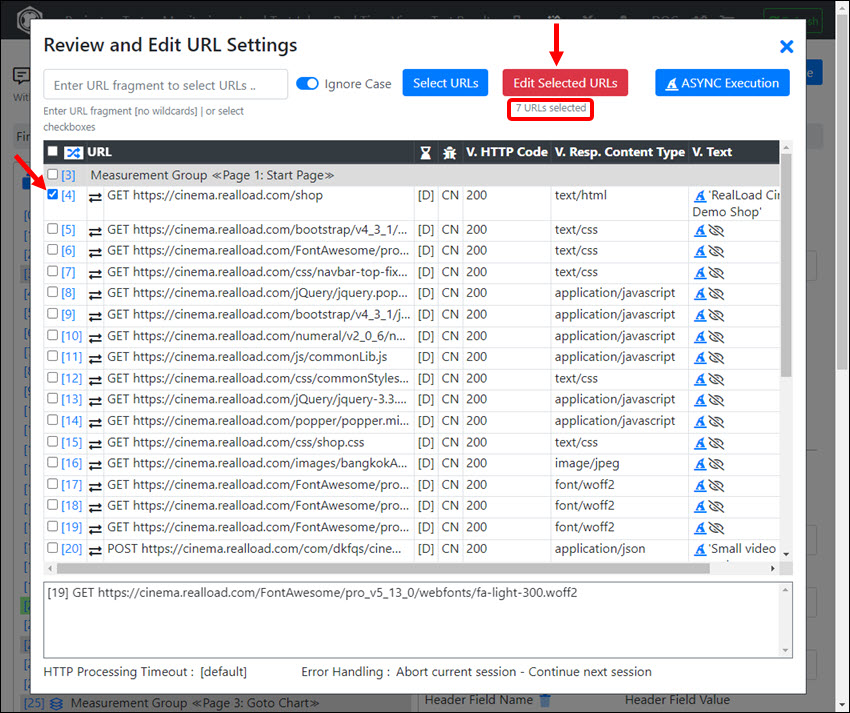
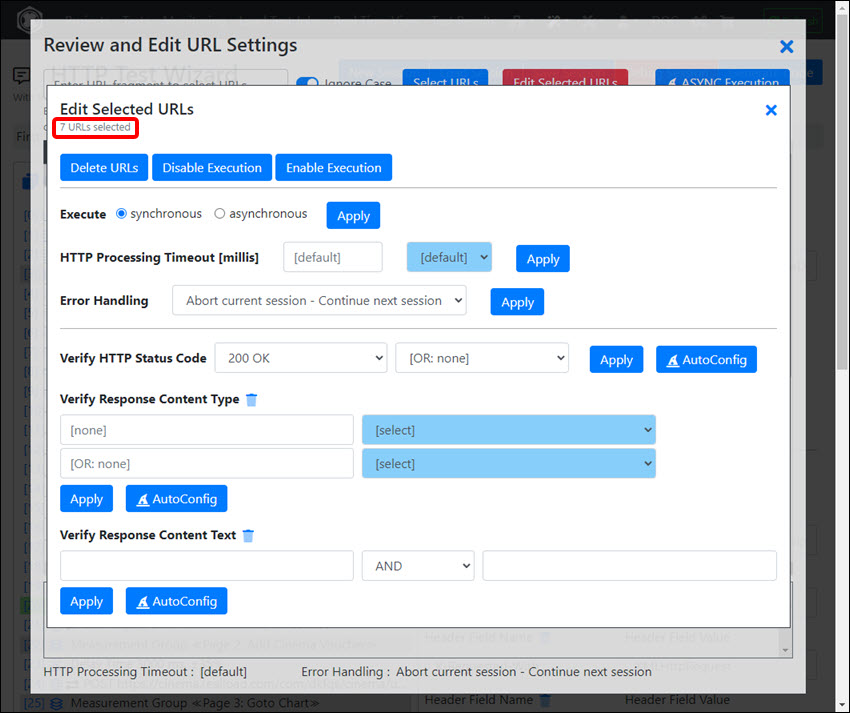
We also recommend you take a look at Reviewing the HTTP Response Content Validations.
Configuring Parallel URL Execution
A ’normal’ browser loads certain URLs of a website in parallel. For example, images are loaded in parallel. The same behavior can also be achieved in the HTTP Test Wizard by calling the ‘AutoConfig Asynchronous URL Execution’ wizard. However, please note that this wizard is not perfect - you will probably need to manually adjust the execution of the URLs

After calling the wizard, the execution of the URLs will look like this, for example:
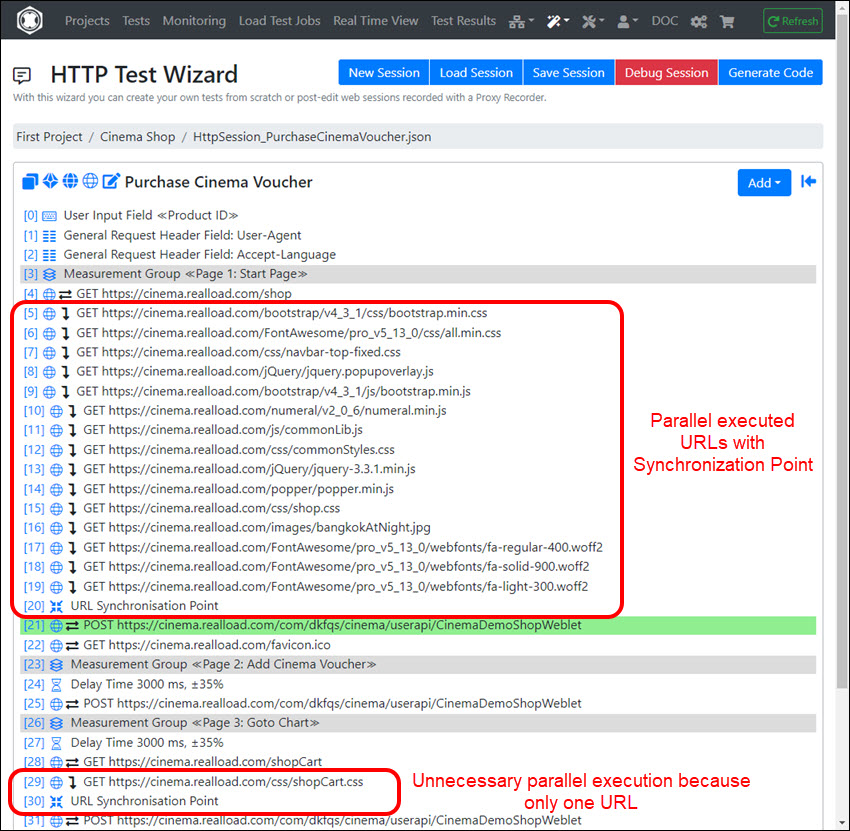
Of course, not all URLs are executed in parallel at the same time. As with a web browser, the HTTP requests are first entered into a queue and then processed by a few working threads (typically 4 threads).
By calling the wizard again you can undo the configuration.
Generating a RealLoad ‘Test’ from an HTTP Test Wizard Session
This is documented at Recording of a Web Surfing Session.
Detailed Doc of Session Elements
User Input Field
“User Input Fields” are additional values that are entered when starting or defining a test execution and that are available as (global) variables during test execution.
A User Input Field contains the following attributes:
- GUI Label : The label of the User Input Field that is displayed in the user interface.
- Variable Name : The name of the global variable at test execution.
- Input Type : The datatype of the input value (String, Integer, Real or Boolean). Please note that the Input Type is only used to validate the input. During test execution, the value of the variable is always converted to a string.
- Default Value : The default value of the variable.
See also Starting a Load Test Job
Measurement Group
Adding Measurement Group(s) is optional and causes the execution time of all subsequent session elements to be displayed in aggregate. The end of a measurement group is defined by either adding another measurement group or reaching the end of the session.
Note: If you Record a Web Surfing Session using a Proxy Recorder, a measurement group is automatically added to the session every time you enter a Page Break.
URL
When adding an URL you have at least to select the HTTP Method (for example GET) and to enter the absolute URL (https://<host>/path).
Checking the HTTP response code is optional, but strongly recommended, as otherwise the test result may contain false positive results.
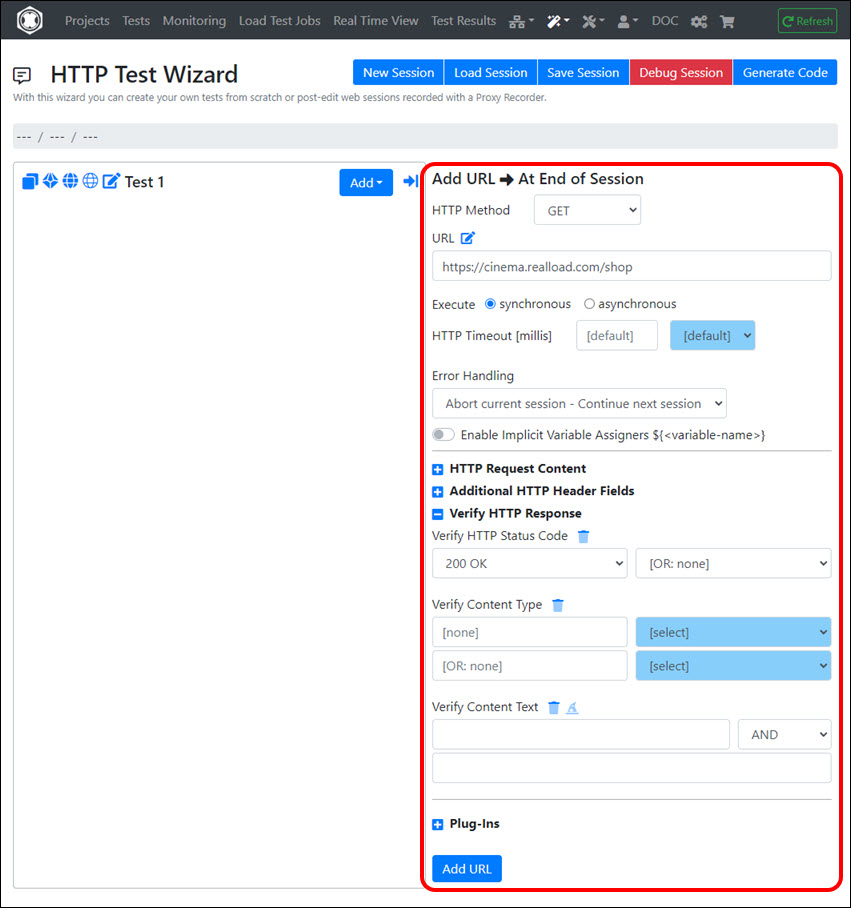
The following fields can be entered or selected:
- General Area
- HTTP Method: Select the HTTP method (GET, POST, …).
- URL: Enter an absolute URL, inclusive (optional) query string parameters. Example: https://www.dkfqa.com/?v=1&w=2
- Execute - synchronous or asynchronous: Determines whether the URL is executed synchronously or in parallel with other URLs (= asynchronous). If you choose “asynchronous” then you have also to add an URL Synchronisation Point to the test sequence after the asynchronous executed URLs.
- Error Handling: Select what happens if the HTTP request fails or if the HTTP response is invalid. “Final End” means that the whole test is aborted.
- Enable Implicit Assigners ${<variable-name>}: If checked, then placeholders for variables are considered in the URL as well as in the HTTP request header and content. Example: URL = https://${vHost}/?v=1&w=2, Variable vHost = “www.realload.com”, Result = https://www.realload.com/?v=1&w=2 . Note: instead of using implicit Assigners you can also define Variable Assigners.
- HTTP Request Content Area | Only fill in this area if the HTTP request contains a content, for example for POST requests.
- Request Content Type: Select or enter the request content type. For example “application/x-www-form-urlencoded” or “application/json”.
- Request Content Charset: Select or enter the request content charset - or let the field blank if not applicable.
- Direct Value or Read From File: Select if the request content data are directly entered here or are read from a file.
- Request Content Data: Enter the request content data (if they are not read from a file). Note: select first the Request Content Type before you enter the Request Content Data.
- Also send Zero Content Length: If checked, but no content is available, the HTTP request header field “Content-Length: 0” is sent.
- Additional HTTP Header Fields Area
- You can enter additional HTTP request header fields here which are only applied for this URL. Note: additional HTTP request header fields that apply to all URLs should instead be defined by using a General Request Header Field session element.
- Verify HTTP Response Area | Note: you should configure at least a HTTP response code in order to verify the test result.
- Verify HTTP Status Code: Select the expected HTTP response code(s).
- Verify Content Type: Select the expected HTTP response content type(s).
- Verify Content Text: Enter text fragments that must be present in the HTTP response content, or let the fields blank if not applicable.
- Plug-Ins Area
- Here you can add Bound to URL Plug-Ins.
URL Synchronisation Point
If you have manually added URLs and configured them to run in parallel (asynchronous) with other URLs, you must add a URL Synchronisation Point after the end of all URLs running in parallel.
See also Configuring Parallel URL Execution
Delay Time
This session element delays execution for a certain time.
The following fields can be entered or selected:
- Title : The title or description (optional).
- Delay Time : The delay time in milliseconds.
- Random Deviation : The random deviation in percent of the Delay Time. Example: if the delay time is 4000 ms and the random deviation is 50% then the randomized delay time that is applied is between 2000 ms and 6000 ms.
Basic Authentication
This session element adds a Authorization: Basic <credentials> HTTP request header field to the HTTP requests of the URLs.
The following fields can be entered or selected:
- Apply for Host : The DNS hostname or the IP Address of the Web Server to which the authentication is sent, or ‘*’ = all Web Servers.
- Apply for Port : The TCP port of the Web Server to which the authentication is sent, or ‘*’ = all Web Servers.
- HTTPS only : If checked, basic authentication will only be sent over encrypted HTTPS connections.
- Direct Value : If checked, the Username and Password can be entered directly. The same value is applied for all simulated users.
- Read Values from Input File : If checked, the Usernames and Passwords are read from an (already defined) Input File. The Scope of the Input File determines how the usernames and passwords are assigned to the simulated users.
- Username : The username (direct value).
- Password : The password (direct value).
- Input File : Select an Input File session element here (if ‘Read Values from Input File’ is checked).
- Username Token No. : Select the token number of the Input File from which the Username is extracted.
- Password Token No. : Select the token number of the Input File from which the Password is extracted.
SSL/TLS Client Certificate
Using this session element, one or multiple SSL/TLS Client Certificates can be configured, which are used for HTTPS server authorization.
The following fields can be entered or selected:
- Apply for Host : The DNS hostname or the IP Address of the HTTPS server.
- Apply for Port : The TCP port of the HTTPS server.
- Single Certificate : If checked, the PKCS12 File can be selected and the Password of the Certificate can be entered directly. The same certificate is applied for all simulated users.
- Multiple Certificates referenced by Input File : If checked, the File Names of the PKCS12 Files and the corresponding Passwords of the Certificates are read from an (already defined) Input File. Note that the PKCS12 Files must be located in the same Project/Resource Set where the Input File is located. The Scope of the Input File determines how certificates are assigned to the simulated users.
- Certificate Password : The password of the certificate (if ‘Single Certificate’ is checked).
- Input File : Select an Input File session element here (if ‘Multiple Certificates referenced by Input File’ is checked).
- PKCS12 File Token No. : Select the token number of the Input File from which the PKCS12 File Name is extracted.
- Certificate Password Token No. : Select the token number of the Input File from which the Password of the Certificate is extracted.
General Request Header Field
This session element adds a HTTP request header field to the HTTP requests of the URLs.
The following fields can be entered or selected:
- Header Field Name : The name of the HTTP request header field. Example: ‘User-Agent’
- Apply for Host : The DNS hostname or the IP Address of the Web Server to which the HTTP request header field is sent, or ‘*’ = all Web Servers.
- Apply for Port : The TCP port of the Web Server to which the HTTP request header field is sent, or ‘*’ = all Web Servers.
- Direct Value : If checked, the value of the HTTP request header field can be entered directly. The same value is applied for all simulated users.
- Assign Value from Variable : If checked, the value of the HTTP request header field is assigned by a Variable. The Scope of the Variable determines how the value of the HTTP Request Header Field is assigned to the simulated users.
- Direct Value : The value of the HTTP Request Header Field (if ‘Direct Value’ is checked).
- Variable : Select a Variable here (if ‘Assign Value from Variable’ is checked).
Cookie Modifier
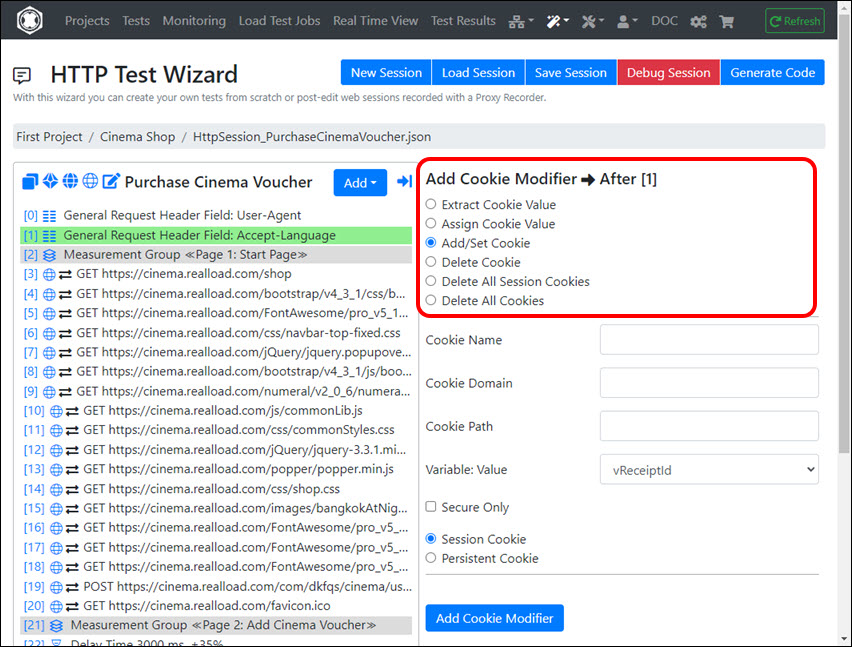
Using this session element, HTTP Cookies can be manipulated - regardless of whether they are “HttpOnly cookies” or not.
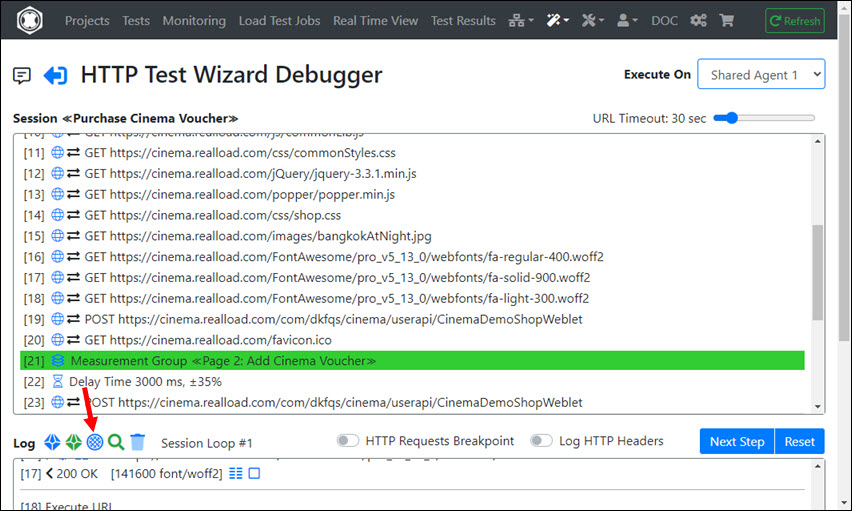
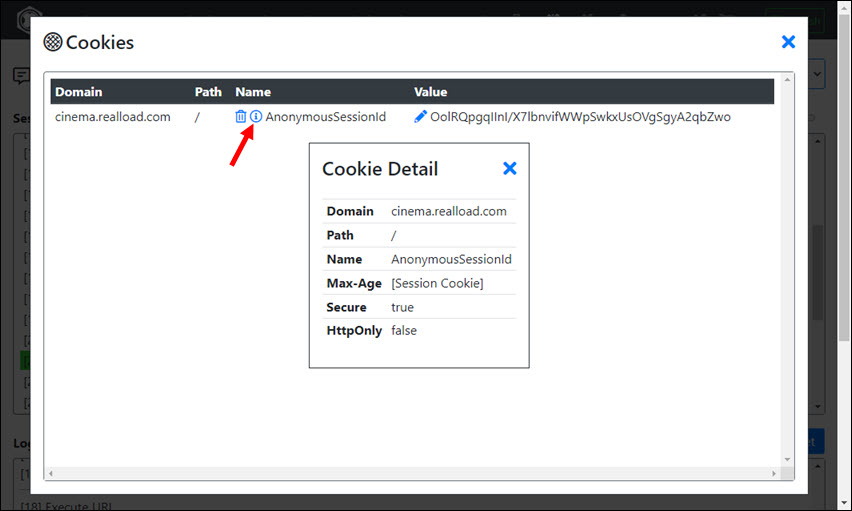
Tip: You can use the Debugger to examine the cookies.
Extract Cookie Value
Extracts the value of a cookie into a variable. The following fields can be entered or selected:
- From Cookie Name : The name of the cookie.
- Cookie Domain : The domain of the cookie.
- Cookie Path : The path of the cookie.
- To Variable : Select a Variable here to which the value of the cookie is assigned.
Assign Cookie Value
Assigns the value of a variable to the value of a cookie. The following fields can be entered or selected:
- From Variable : Select a Variable here whose value is assigned to the cookie.
- To Cookie Name : The name of the cookie.
- Cookie Domain : The domain of the cookie.
- Cookie Path : The path of the cookie.
Add/Set Cookie
Adds or overwrites a cookie. The following fields can be entered or selected:
- Cookie Name : The name of the cookie.
- Cookie Domain : The domain of the cookie.
- Cookie Path : The path of the cookie.
- Variable: Value : Select a Variable here whose value is assigned to the cookie value.
- Secure Only : If checked, the cookie will only be sent over encrypted HTTPS connections.
- Session Cookie : If checked, the cookie is only valid in the session loop of the simulated users (all session cookies will be cleared before each iteration of a session loop).
- Persistent Cookie : If checked, the cookie is a permanent cookie.
Delete Cookie
Deletes a cookie. The following fields can be entered or selected:
- Delete Cookie Name : The name of the cookie.
- Cookie Domain : The domain of the cookie.
- Cookie Path : The path of the cookie.
Delete All Session Cookies
Deletes all session cookies.
Delete All Cookies
Deletes all cookies.
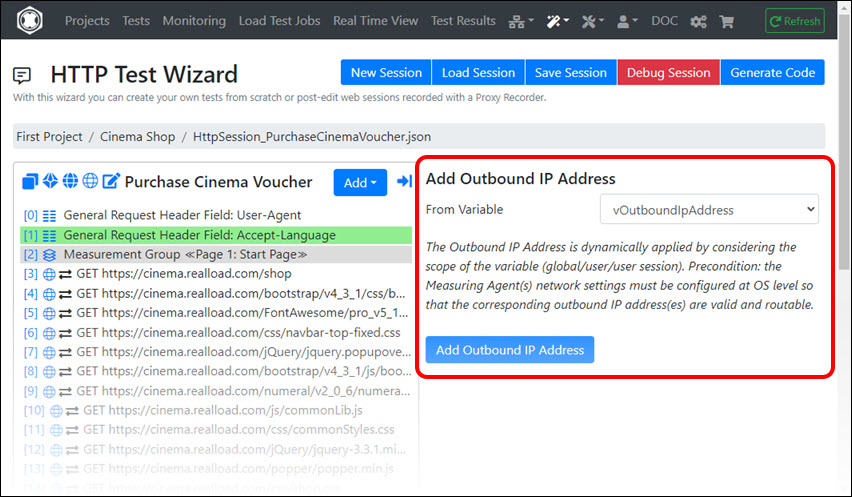
Outbound IP Address
The dynamic assignment of multiple outbound IP addresses for the executed URLs of the simulated users is only possible if you operate specially configured Measuring Agents yourself - or have them operated by us.
Basically, every internet device only has a single routable IP address. However, each operating system can be reconfigured so that it supports multiple IP addresses - if the network environment allows it and the additional IP addresses are also routable.
The Outbound IP Addresses are set by a Variable (often extracted from an Input File), where the Scope of the Variable determines how the Outbound IP Addresses are assigned to the simulated users.
Conditional Jump
This session element performs a conditional jump (conditional GoTo) to any other session element, based on a fixed value or on the value of one or several variables. The number of jumps is counted and can also control the conditional execution.
Background Information on the Technical Concept
Conditional jumps are powerful elements for jumping back and forth in a session, and also contain an internal counter that counts how many jumps have been made. Using this internal counter, inner session loops can also be implemented - but in a much more flexible way as traditional ‘for’ or ‘while’ loops.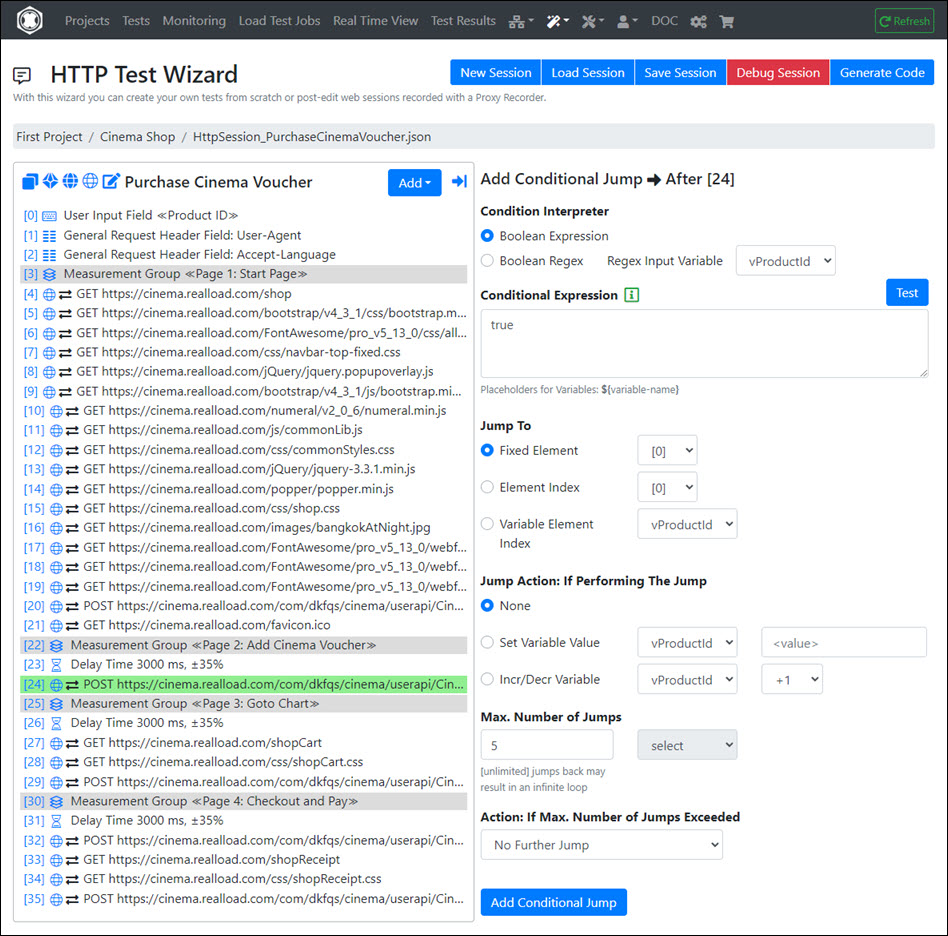
Conditional Jumps are based on a Conditional Expression whose result is always true or false. If the condition is true, the test execution of the currently executed user session jumps to the addressed (target) session element.
Two types of Condition Interpreters are supported:
- Boolean Expression, such as 1 <= 2
- Boolean Regex, such as (.)Zurich(.)
One or multiple Placeholder for Variables in the format ${variable-name} can be used at any point in a Conditional Expression:
- Example of Boolean Expression with a placeholder variable: ${X} <= 2
- Example of Boolean Regex with a placeholder variable: (.)${Y}(.)
Functionality of the Boolean Expression Interpreter
The Boolean Expression Interpreter supports:
- The simple keywords true and false (without further text) which effects that the interpreter always returns true or false.
- Simple conditional expressions, such as 10 > 9 | Note: simple expressions are not enfolded by brackets.
- Boolean expressions with two conditional expressions, such as (5 > 6) || (6 > 5)
- Multiple boolean expression, such as ((5 > 6) or (6 > 5)) and ("Meier" contains "ei")
Supported comparison operators:
- <
- <=
- ==
- >=
- >
- !=
- contains
- !contains
Supported boolean operators:
- && or alternatively the keyword and
- || or alternatively the keyword or
Parsing of values:
- First the interpreter tries to convert values into numbers. If this succeeds for both values of a conditional expression, the comparison is performed with the numbers.
- If one of the values cannot be converted into a number, both values are interpreted as text and compared as text.
- Simple text values cannot contain spaces. However, it is supported for text values to be enclosed in double quotes, which circumvents this restriction.
-
Text values enclosed in double quotes are not converted to a number.
Functionality of the Boolean Regex Interpreter
The Boolean Regex Interpreter requires two arguments:
- The input to which the Regex is applied. This is always referenced by a variable whose value is interpreted as Regex input.
- The Boolean Regex itself which can contain placeholder for variables. The values of the placeholder variables are replaced first, before the Boolean Regex is evaluated.
Jump To : Target Session Element
A target session element can be:
- A fixed session element : That means that the jump is always made to this session element, regardless of whether new session elements are added or existing session elements are deleted.
- A Session element addressed by element index : That means that the jump is performed to the index of a session element. In case if session elements are added or deleted, the jump target may change - you may need to reconfigure the conditional jump settings in such a case.
- A Session element addressed by a variable whose value is interpreted as (integer number) element index. This allows dynamic jumps.
Jump Action
The jump action is performed when the jump is executed (if Conditional Expression == true):
- None (no specific action)
- Set Variable Value : When jumping, the variable is set to this value.
- Incr/Decr Variable : When jumping, the value of the variable is interpreted as (long) integer number and incremented or decremented by the configured amount.
Max. Number of Jumps
This is the limit of the maximum executed jumps per user session (per session loop) - applied to this conditional jump. For jumps back to previous session elements, this limit should never be ‘unlimited’, otherwise this can end in an endless loop.
After this limit has been reached, the Action: If Max. Number of Jumps Exceeded rules what happens next.
Action: If Max. Number of Jumps Exceeded
One of the following actions can be configured if the limit of ‘Max. Number of Jumps’ is exceeded for this conditional jump:
- No Further Jump : Recommended for simple inner loops.
- Abort User Session and Report Error : The simulated user aborts the current session and will continue with the next session (if the maximum number of outer session-loops per user is not reached).
- Abort User and Report Error : The simulated user is terminated - but all other simulated users continue to run.
- Abort Test and Report Error : All simulated users will be stopped and the test execution will be aborted prematurely.
Plug-In
See Plug-Ins.
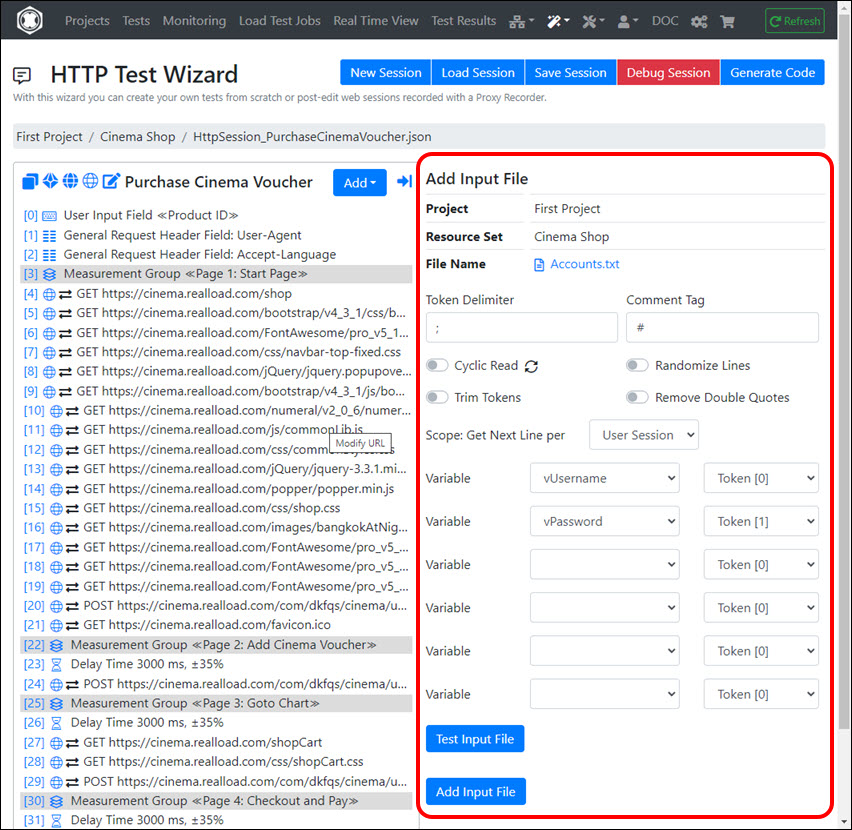
Input File
Input files are text files (*.txt, *.csv) whose content is read line by line during the test. Each line is divided into tokens from which values of variables are extracted. Empty lines are skipped. Note that the variables whose values will be extracted from the input file must first be defined before you can add an input file.
The following fields can be entered or selected:
- Token Delimiter: The token delimiter. This is usually a single character, but can be also a string.
- Comment Tag: Lines which are starting with the comment tag are skipped. You can place also the comment tag within a line which means that the remaining part of the line is ignored. The comment tag is usually a single character, but can be also a string.
- Cyclic Read: If not checked, then the test will end when no further line can be read (at eof). On the other hand, if checked, the file is re-read after the end of file was reached.
- Randomize Lines: if checked then the order of the lines is randomized each time when the file is read.
- Trim Values: If checked then whitespace characters are removed from the start and end of the extracted values (tokens).
- Remove Double Quotes: If checked then double quotes are removed from the extracted values (tokens).
- Scope: Get Next Line per:
- Global: Reads only a single one line of the file. The line is read at the start of the test.
- User: Reads each time a line from the file when a simulated user is started.
- User Session: Reads each time a line from the file when a simulated user starts a new session loop iteration.
- 6x Variable - Token[Index]: You can configure up to 6 token indexes whose values are extracted into variables.
Output File
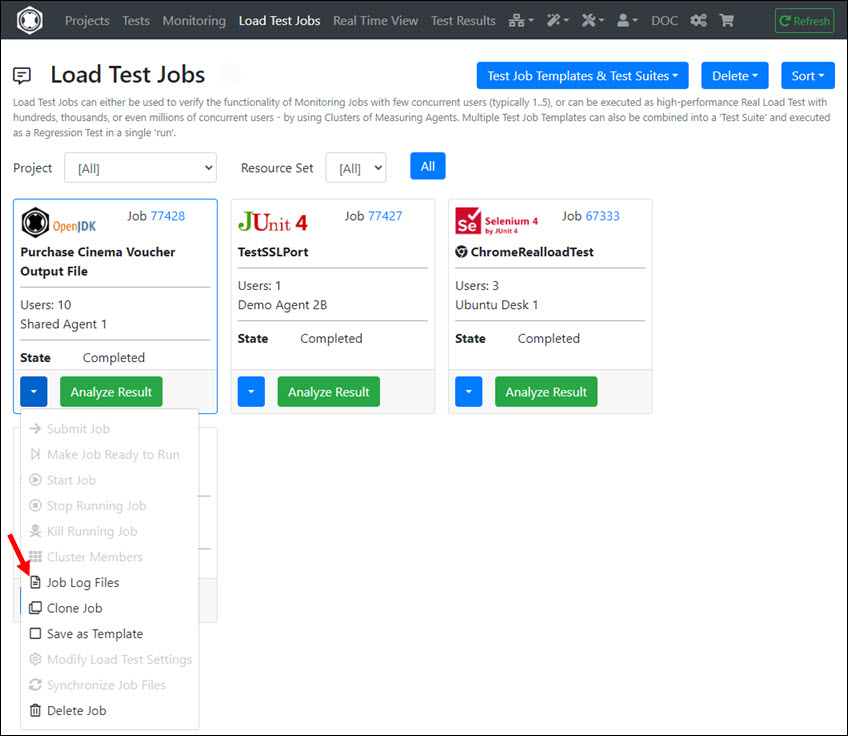
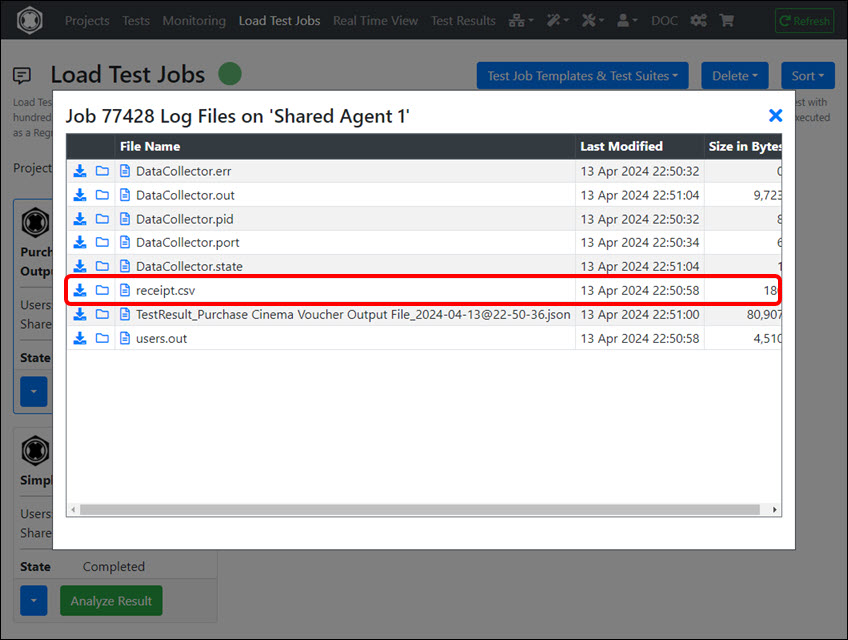
Output files are text files (*.txt, *.csv) into which values of variables are written. The file is saved in the output directory of the test job.
The following fields can be entered or selected:
- Output File Name: The name of the output file.
- Scope: Write Line per:
- Global: Only a single line is written to the file at the end of the test.
- User: Each time a simulated user’s execution ends, a line is written to the file.
- User Session: At the end of each execution of a session loop of any simulated user, a line is written to the file. If the session loop is aborted (for example because an error was measured), no line is written.
- Value Separator: The separator between the values.
- Enclose Values: Here you can configure how the values are enclosed.
- 6x Variable: Up to 6 Variables can be selected
Application Example
You can use Output Files with the Scope ‘User Session’ to filter out invalid accounts from a list of accounts (from an Input File), since invalid accounts do not reach the end of the session loop - and no new line is then added for them to the output file. This means that the output file only contains valid accounts.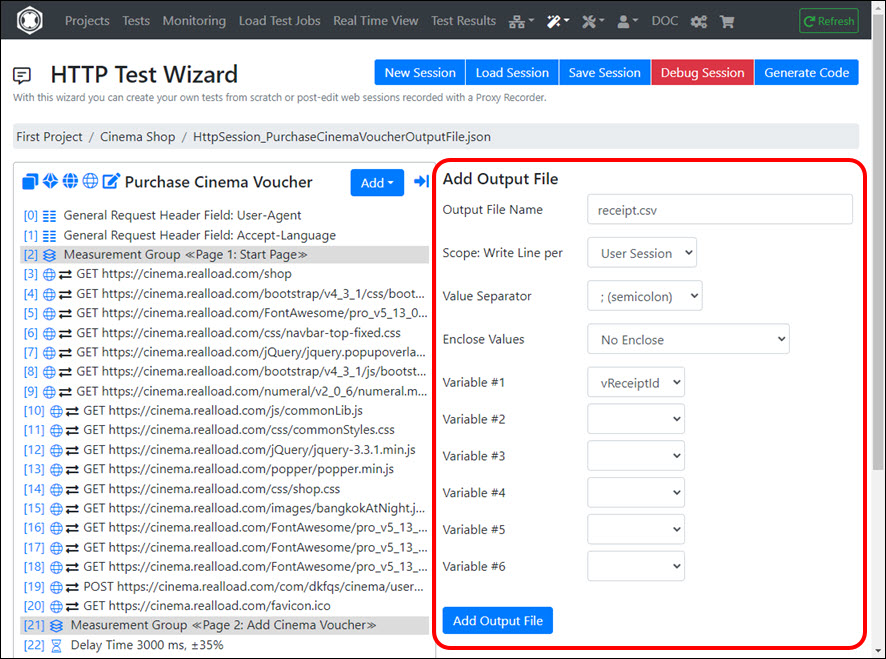
Plug-Ins
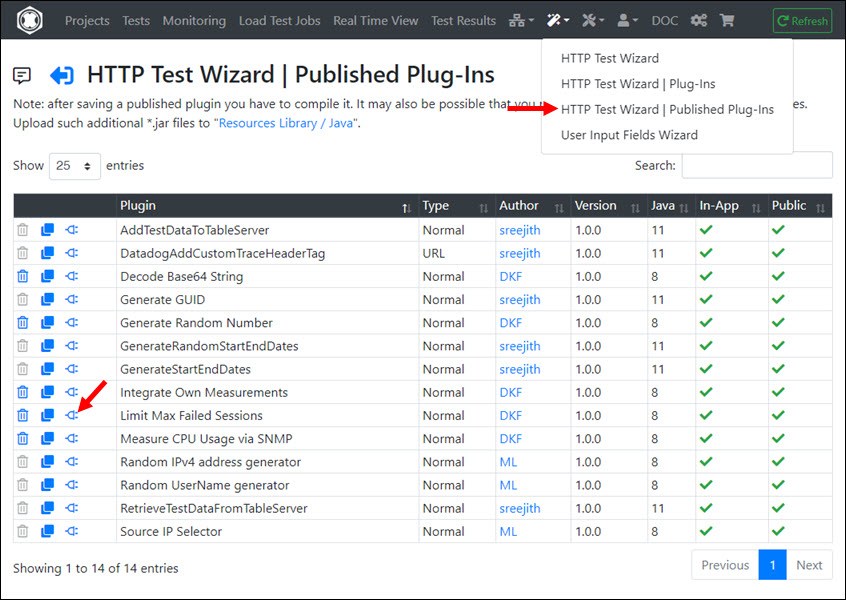
Plug-Ins are reusable HTTP Test Wizard extensions that are manually programmed. They can also be published by manufacturing users and imported by other users. Therefore, before you start programming your own plug-in, take first a look at the already published plug-ins.
Note
In order to extract and assign variable values from and to URLs, no plug-ins are normally required, since a large number of algorithms are available. The use of plug-ins only makes sense if there are special requirements that go beyond the standard functionality of the HTTP Test Wizard.Plug-In Types
There are 3 types of plug-ins:
- Normal Session Element Plug-Ins: As the name suggests, such plug-ins are executed as a normal session element. This type of plug-in is versatile and can, among other things, process variables, abort the current session, the user or the entire test, or even perform independent measurements with any protocol.
- Bound to URL Plug-Ins: Such plug-ins are linked to a URL session element and can change the HTTP request before sending it to the server and post-process the received HTTP response - such as extracting variable values or checking the content of the HTTP response. Such plug-ins can also abort the current session, the user, or the entire test.
- Java Source Code Modifier Plug-Ins: These are special plug-ins that can subsequently modify the source code generated by the HTTP Test Wizard. Usually such plug-ins are only used as a workaround if the HTTP Test Wizard generates faulty or incomplete source code.
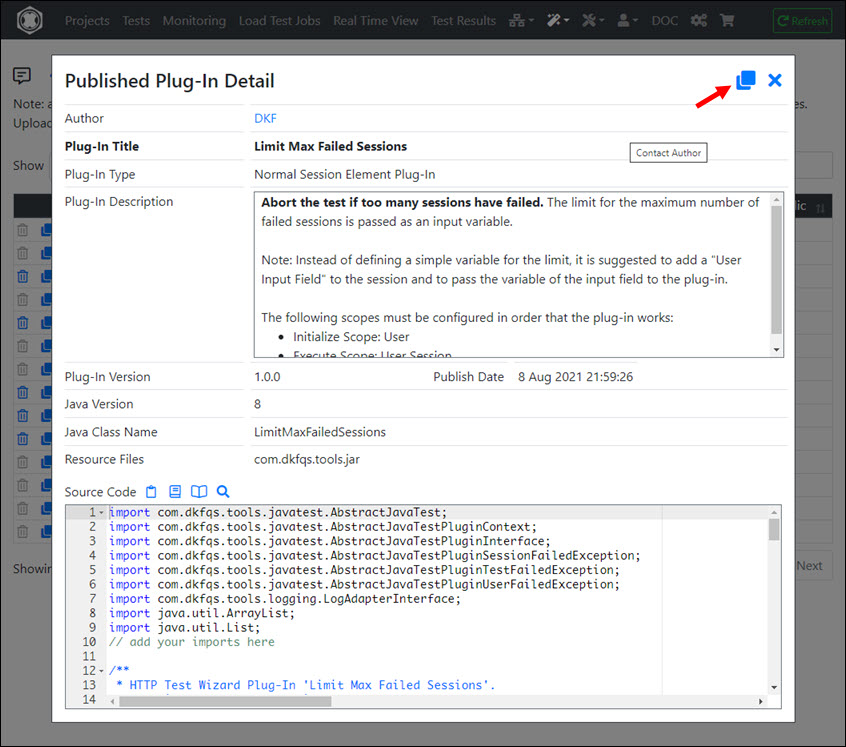
Importing Published Plug-Ins
Note
For copyright and security reasons, the published plug-ins only contain the source code, but not the compiled code and no third-party JAR libraries that may be required.
If third-party JAR libraries are required, the “Plug-in Description” provides instructions on how to download these libraries. Third-party JAR libraries should always be saved in the project/resouce set “Resources Library/Java”.
After you have imported the plug-in you have to load and compile it - then save the compiled plug-in.
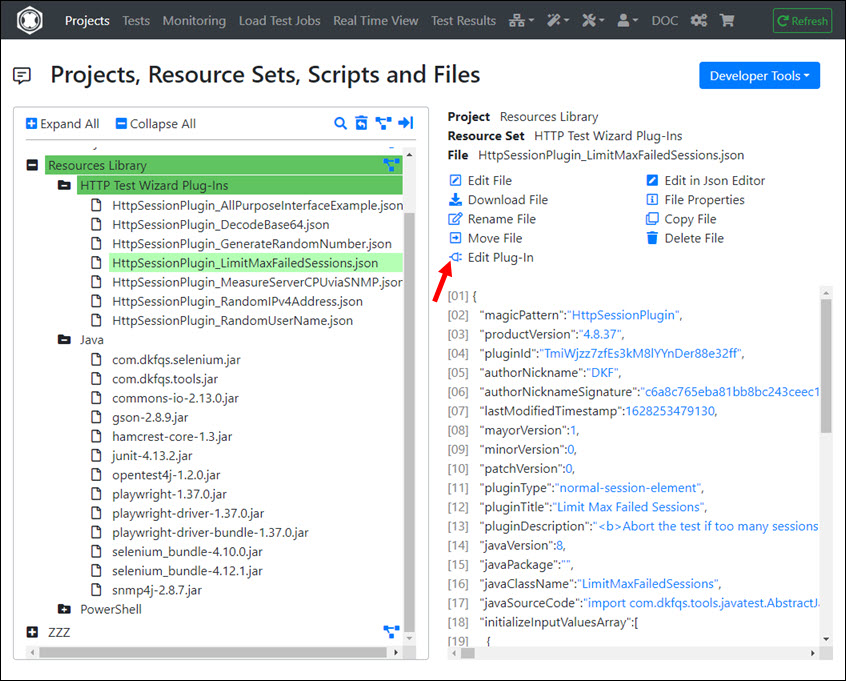
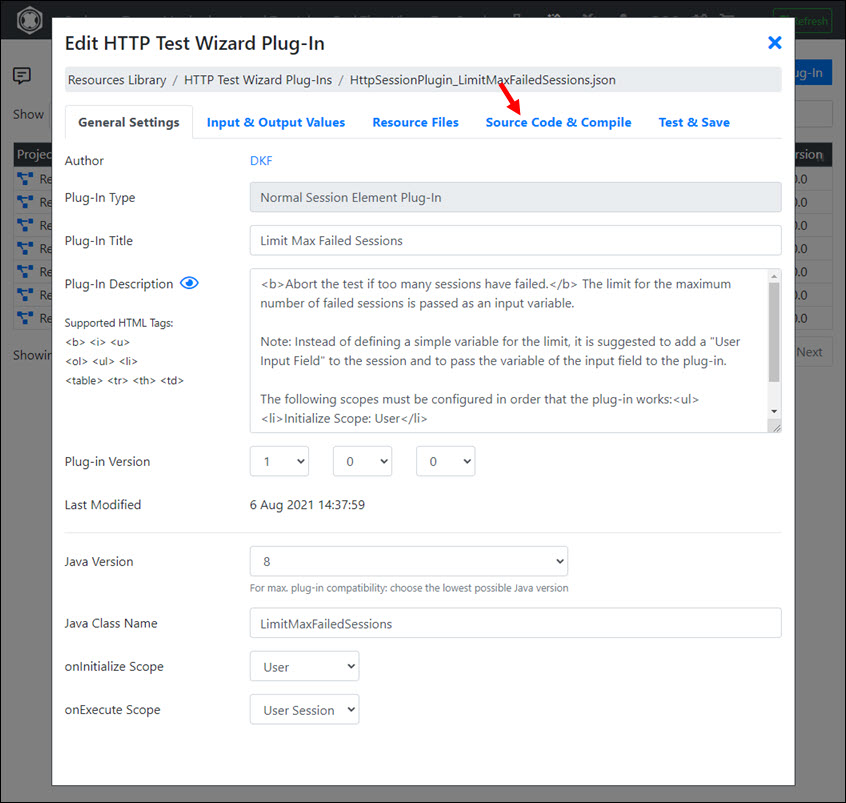
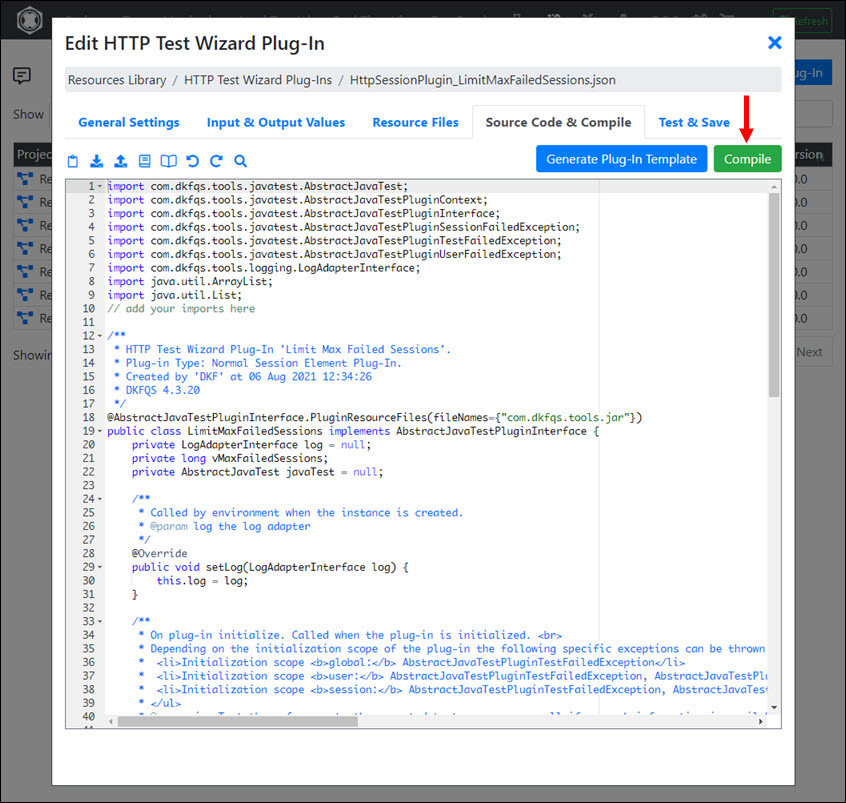
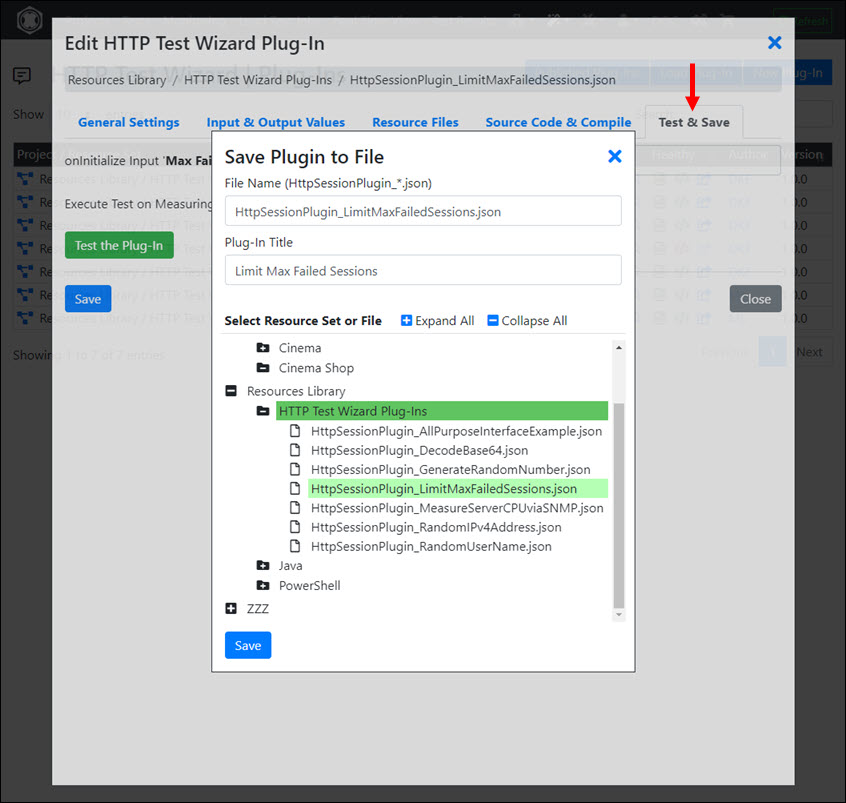
After you have saved the compiled plug-in you can add it to your HTTP Test Wizard session. Plug-ins of the type “Java Source Code Modifier Plug-Ins” do not have to be added, but can be called directly after the source code of the test program has been generated.
How do I get Support from the Plug-In Manufacturer?
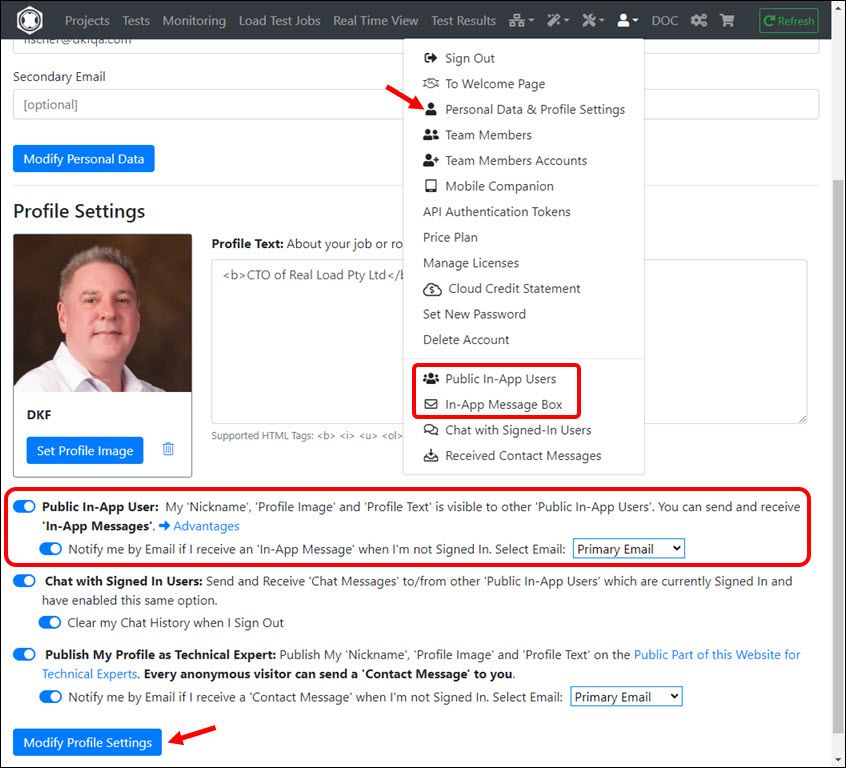
In order to get support from the plug-in manufacturer, you have to enable in your Profile Settings the option “Public In-App User”. Then you can communicate with the plug-in manufacturer via “In-App Messages”.
Developing own Plug-ins
Own plug-ins can be developed in Java 8 or 11. The following example shows a plug-in which decode a base64 encoded string.
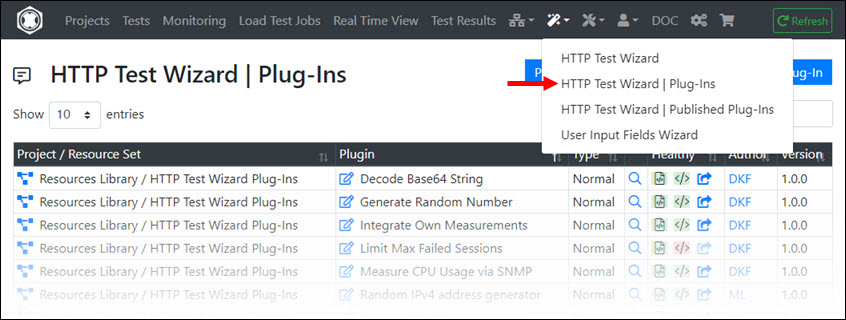
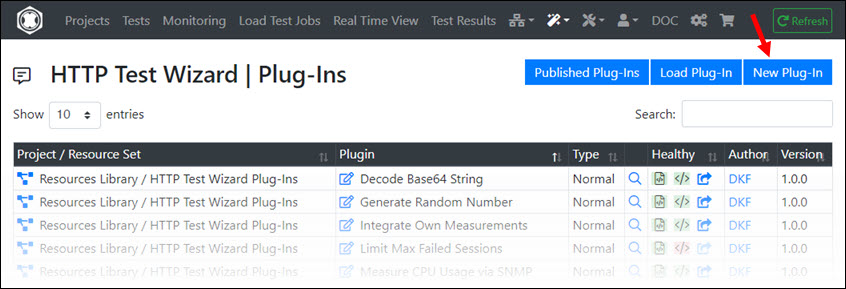
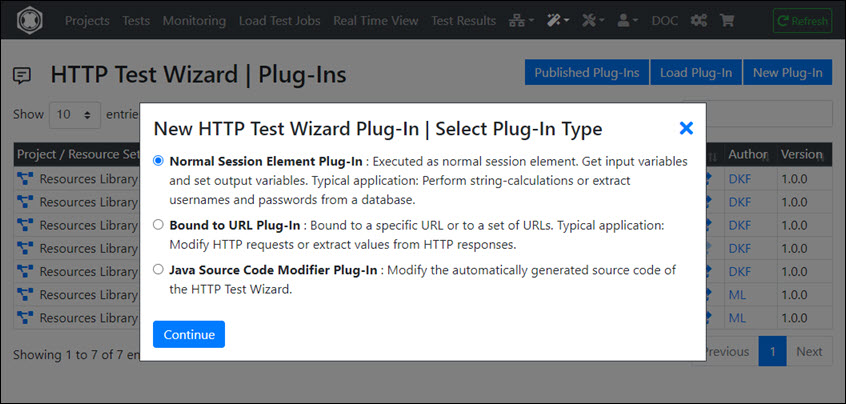
After clicking at “New Plug-In” the plugin type has to be selected (in this example “Normal Session Element Plug-In”):
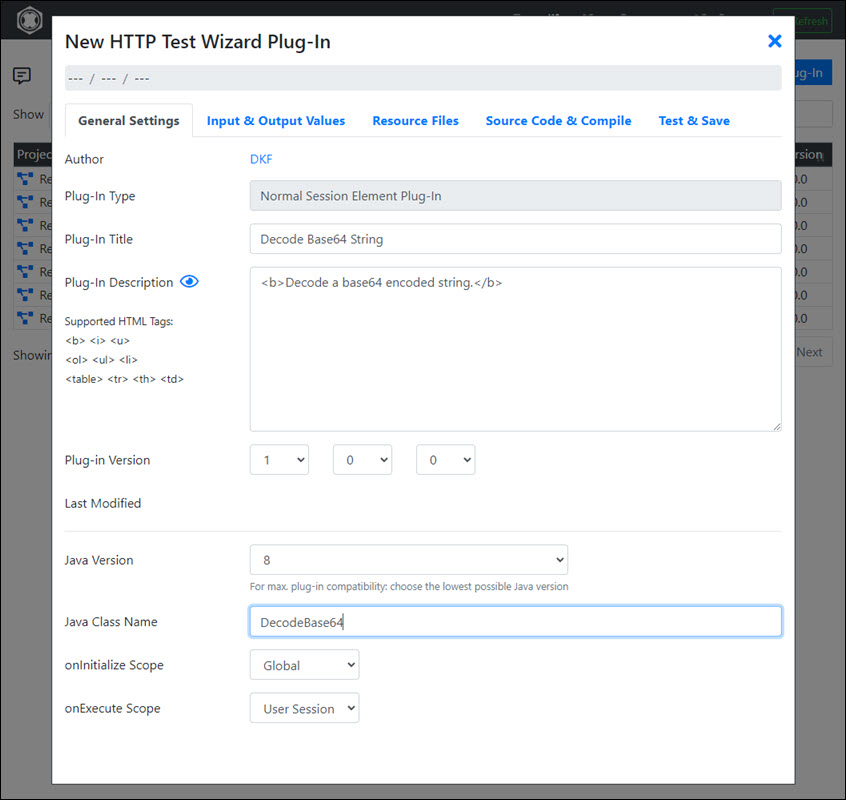
At the “General Settings” tab you have at least to enter the Plug-In Title and the Java Class Name. You should als enter a Plug-In Description which can be formatted by simple HTML tags. The onInitialize Scope can be set to “Global”, as this plug-in does not require any initialization. The onExecute Scope is set to “User Session” in order that all kind of variable scopes are supported.
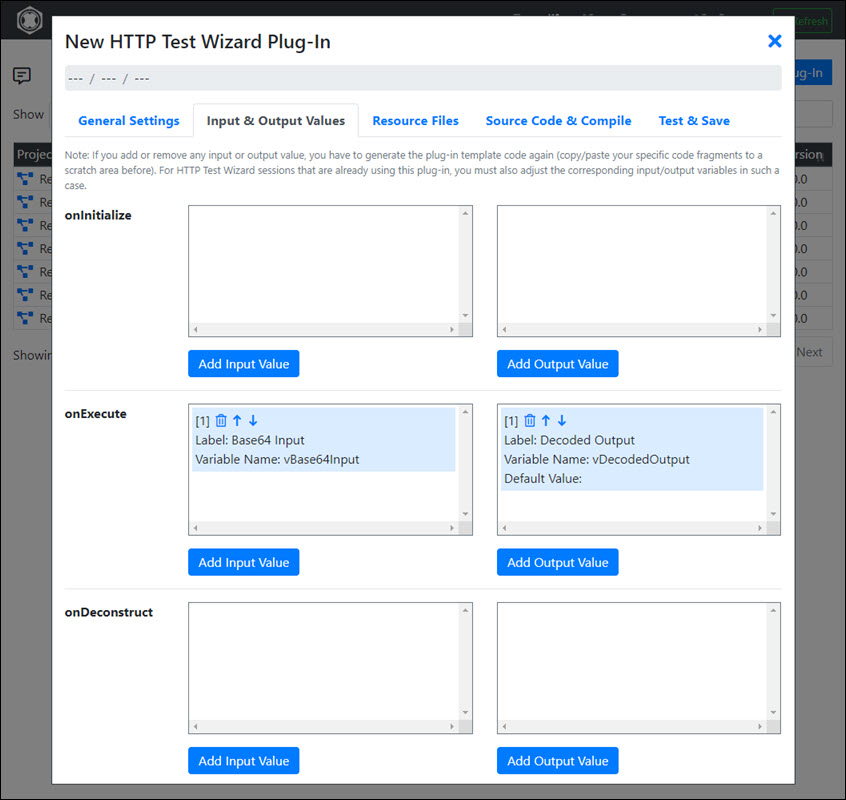
At the next tab - “Input & Output Values” - a plug-in input and a plug-in output (Java-)variable is defined for the plug-in method onExecute. The values of this two Java variables will later correspond with two HTTP Test Wizard variables (which may have a different variable name):
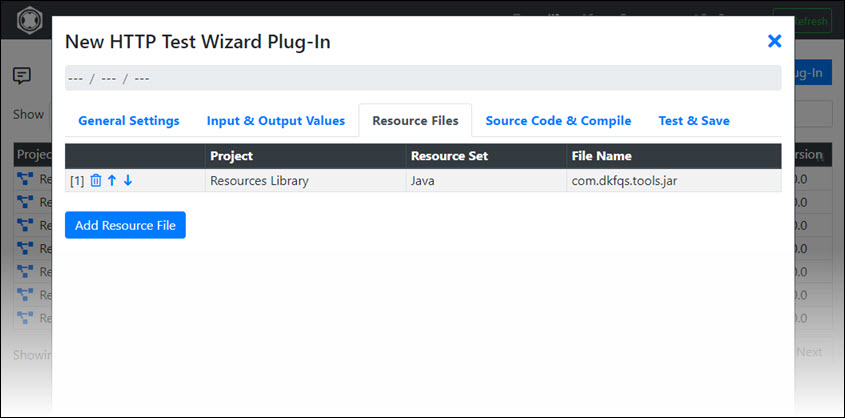
When you click at the next tab - “Resources Files” - you will see that the Java library com.dkfqs.tools.jar is already added to the plugin. This is normal as all kind of plug-ins require this library. Here you may add also other Java libraries required by the plug-in - but in this case no other libraries are needed.
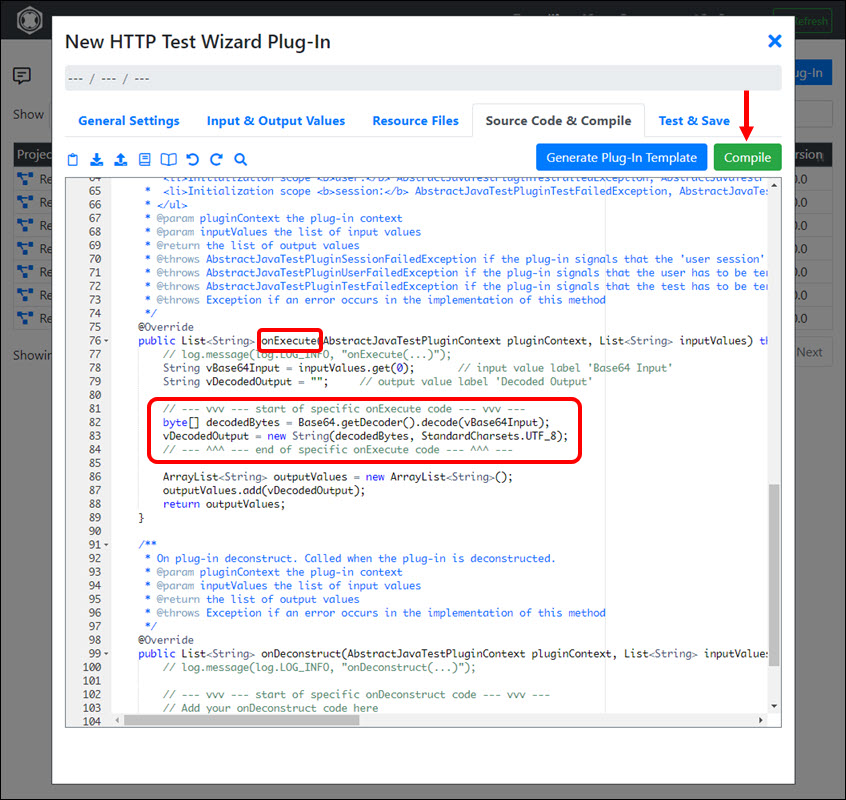
Now at the “Source Code & Compile” tab, you can first generate the plug-in template. Then you have to extend the generated code with your own code, ie in this example you have to complete the Java import definitions and program the inner logic of the Java method onExecute. Then compile the plug-in.
Java Doc of com.dkfqs.tools
The Java Doc for the packages of com.dkfqs.tools is available at download.realload.com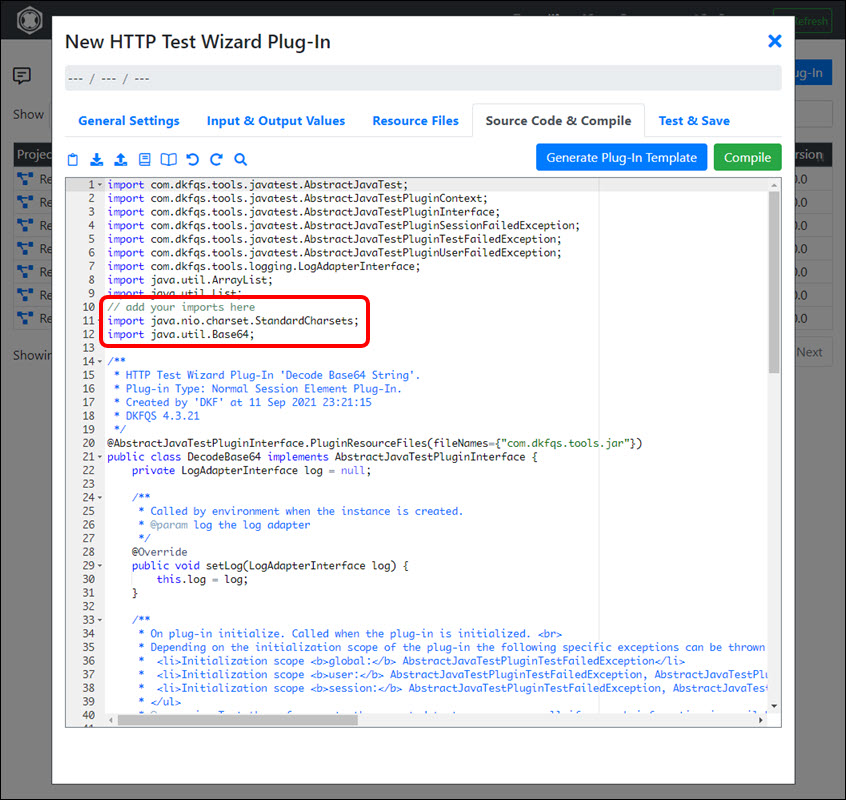
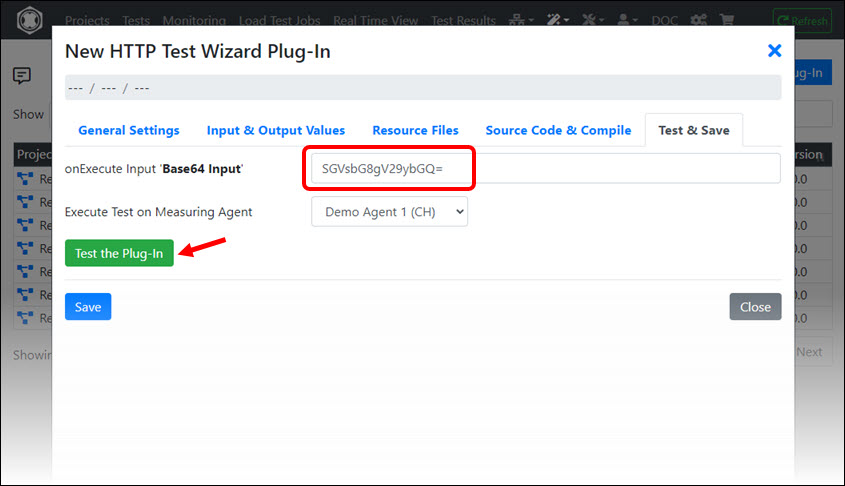
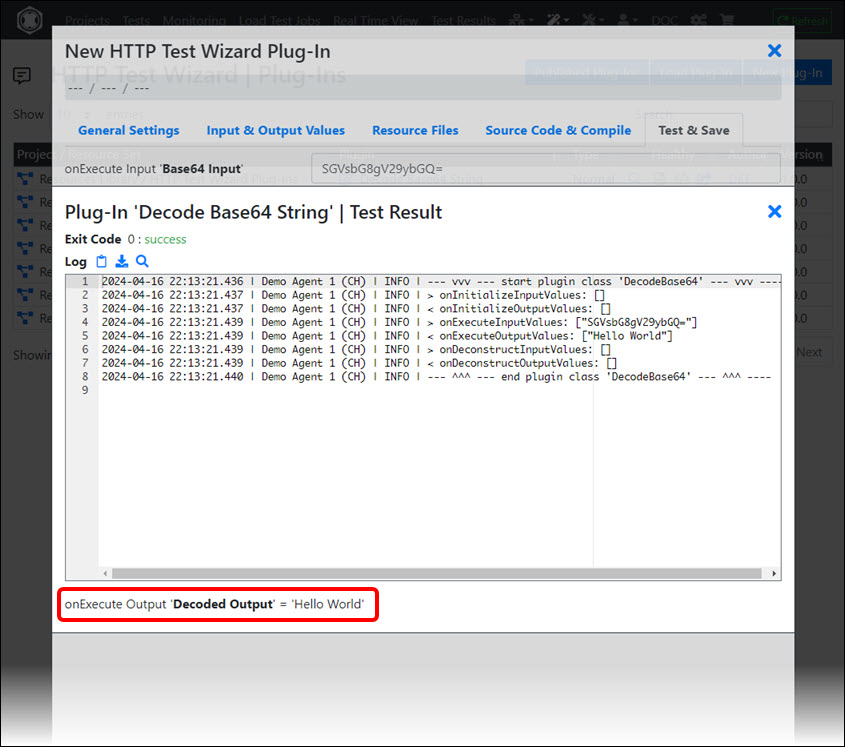
At the last tab “Test & Save” you can first test the plug-in (remotely) on any Measuring Agent. To perform the test enter for example “SGVsbG8gV29ybGQ=” as input and you will see as output “Hello World”.
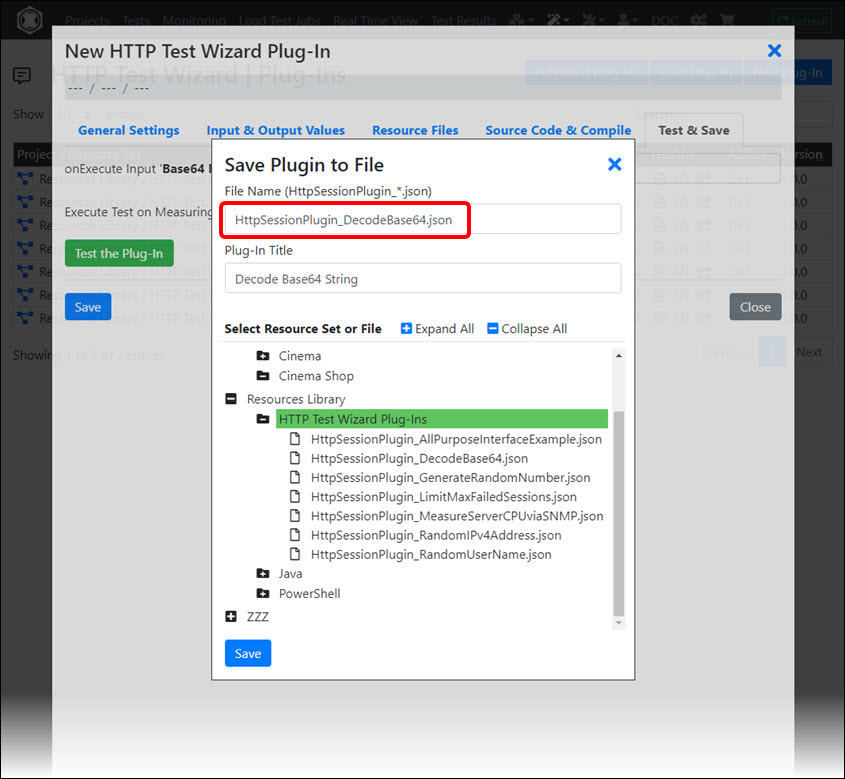
Finally save the plug-in:
After you have saved the plug-in click at the “Close” button. Then you will see the new plug-in in the plug-in list:
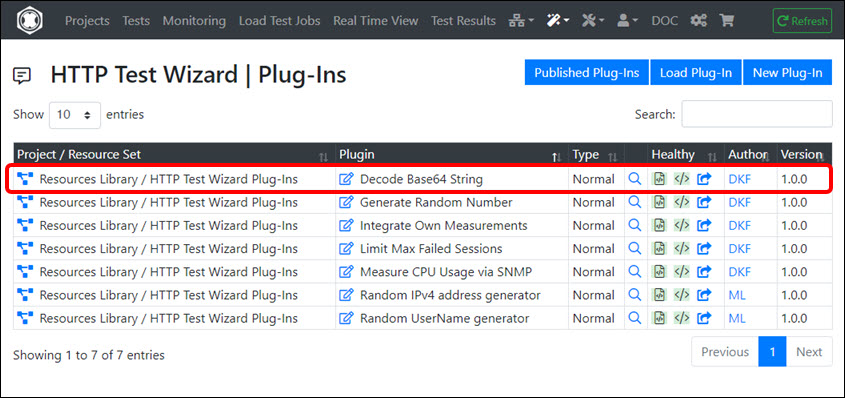
Publishing Plug-Ins
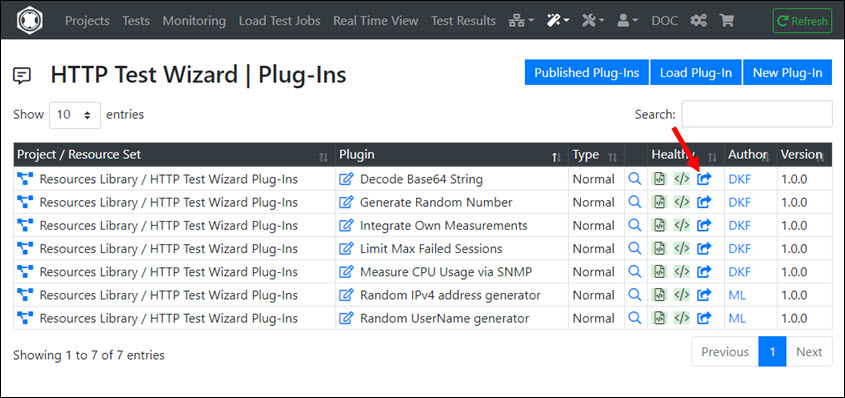
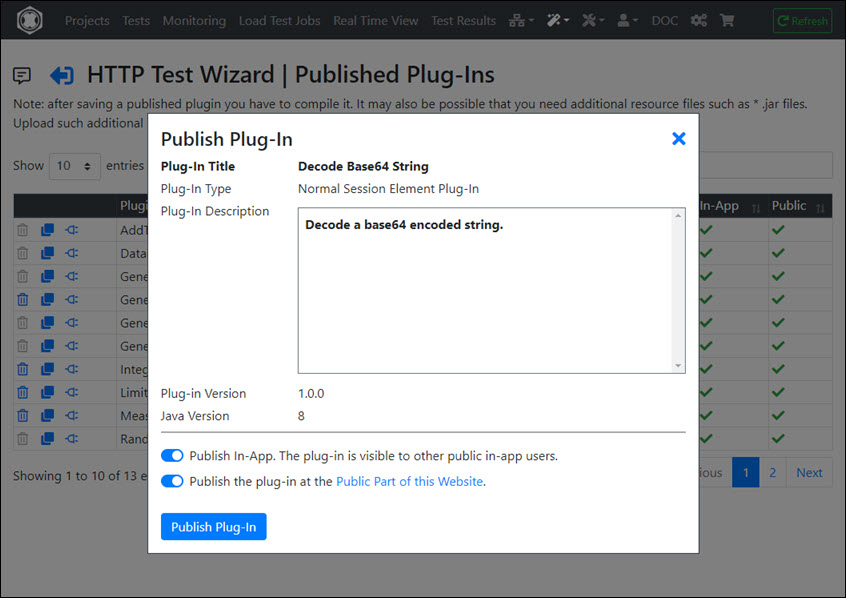
If your plug-in can be used universally, it would be nice if you also publish it - to make it available to other users.
Note that you have to enable in your Profile Settings the option “Public In-App User” in order that you entitled to publish plug-ins.
Publishing plug-ins is especially useful for users who have additionally activated the option “Publish My Profile as Technical Expert” in their Profile Settings. This will significantly improve your visibility and competence.
Debugger

The HTTP Test Wizard Debugger is a powerful tool with some special features:
- It is a Remote Debugger, which means the instructions are always executed on a Measuring Agent. This also allows you to debug the session from different geographical locations.
- The debugger works directly with the definitions made in the HTTP Test Wizard - so there is no code to compile before debugging a session.
- During debugging, variables can also be defined, modified, and deleted.
- Values of variables can extracted from HTTP responses and assigned to HTTP requests (in addition/alternative to the Variables Wizard of the URL Explorer).
- All definitions made in the debugger regarding variables are synchronized with the HTTP Test Wizard session.
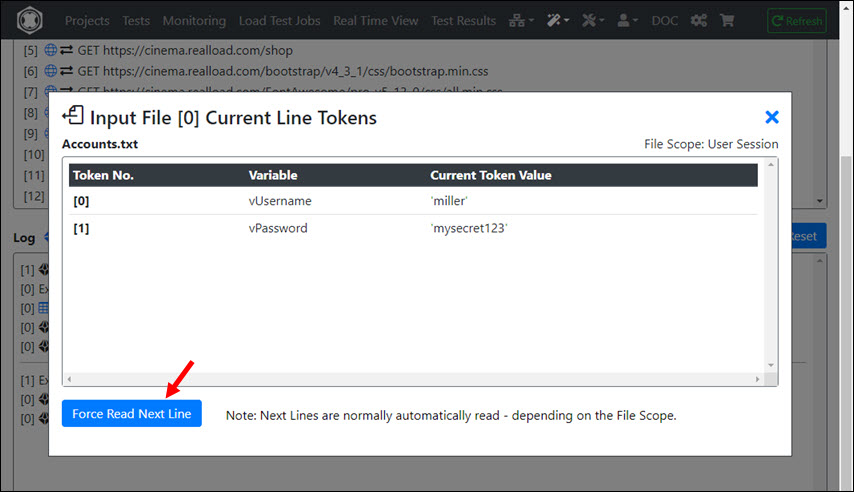
- You can force the debugger to jump over lines of Input Files.
- The value of HTTP Cookies can be examined and modified.
- The value of variables can be monitored in real-time.
- You can search for a text over all (so far) executed HTTP requests and responses.
![]()
Selecting the Measuring Agent
The executing Measuring Agent can be selected in the upper right corner. The debugger is reset when you select another Measuring Agent.

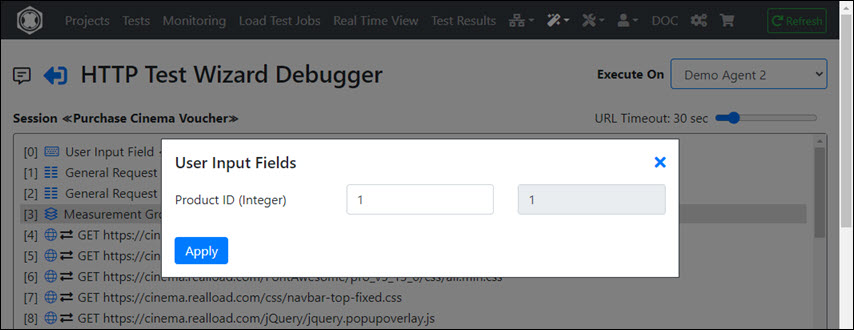
Values of User Input Fields
If your session contains User Input Fields, you will be prompted to enter their values when the debugger is initialized or reset.
Jumping over Lines of Input Files
Reading the lines of Input Files is automatically processed by the debugger. However you can force the debugger to jump over the lines of an Input File.

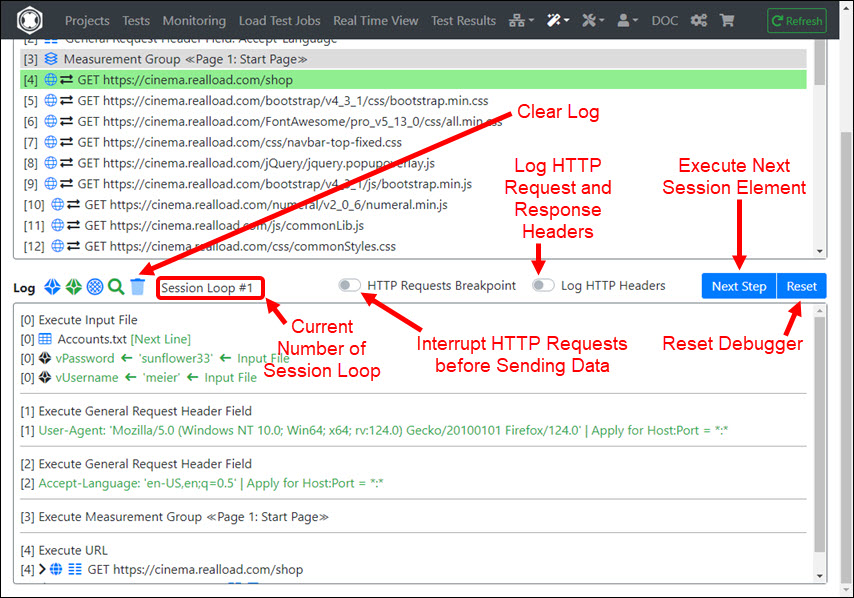
Debugging the Session
Click Next Step repeatedly to debug the session.
If you want to assign the value of a variable to an HTTP request, briefly enable HTTP Requests Breakpoint before the URL is executed. After that, you should disable this option.
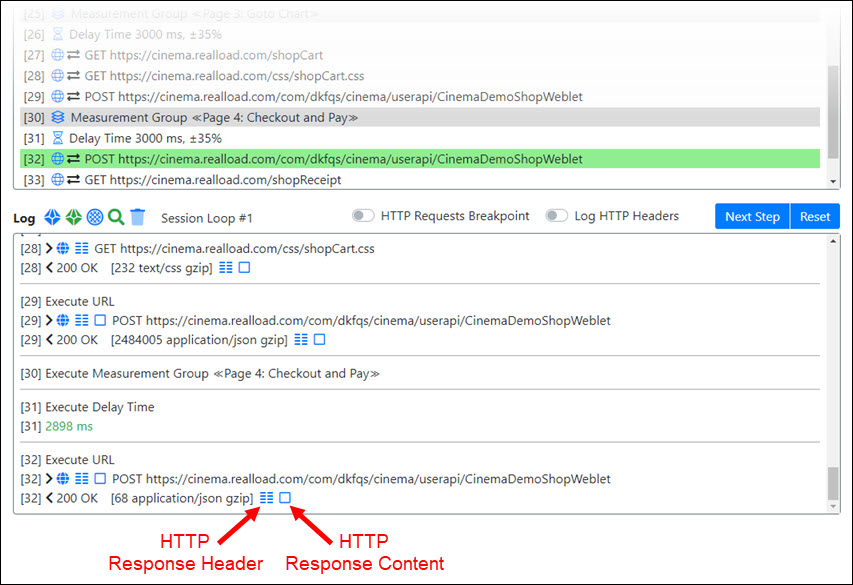
Extracting Values from HTTP Responses
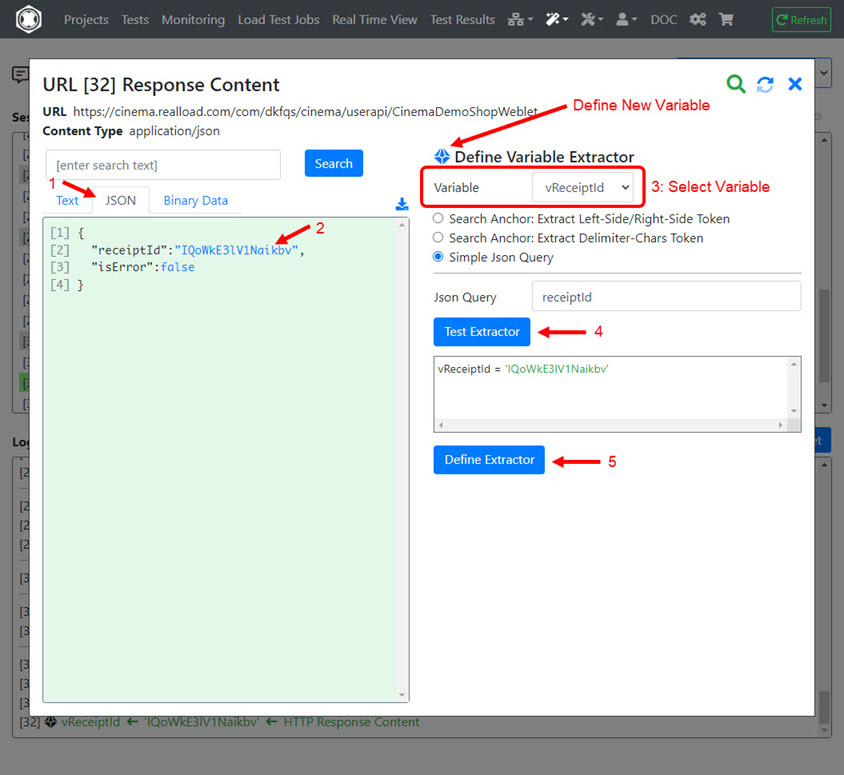
Click the received HTTP Response Header or Response Content of a URL to extract a value into a variable:
This example extracts the value of a JSON response into a variable. If the variable does not yet exist, you can define it first.
Assigning Values to HTTP Requests
Proceed as follows
- Enable ‘HTTP Requests Breakpoint’ before the URL is executed.
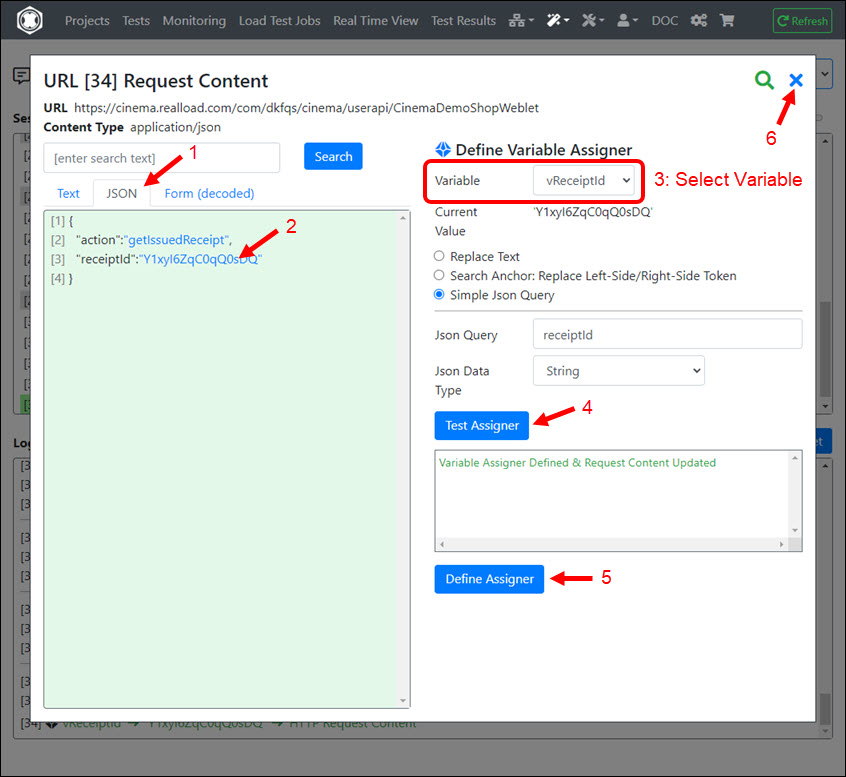
- Click ‘Next Step’. The data of the HTTP request is then initialized, but the request is stopped ‘in the middle’, meaning it is not yet sent to the HTTP(S) server.
- Assign the value to the URL, or to the HTTP Request Header, or to the HTTP Request Content.
- Disable ‘HTTP Requests Breakpoint’.
- Click ‘Continue’. The HTTP request is now sent to the HTTP(S) server.
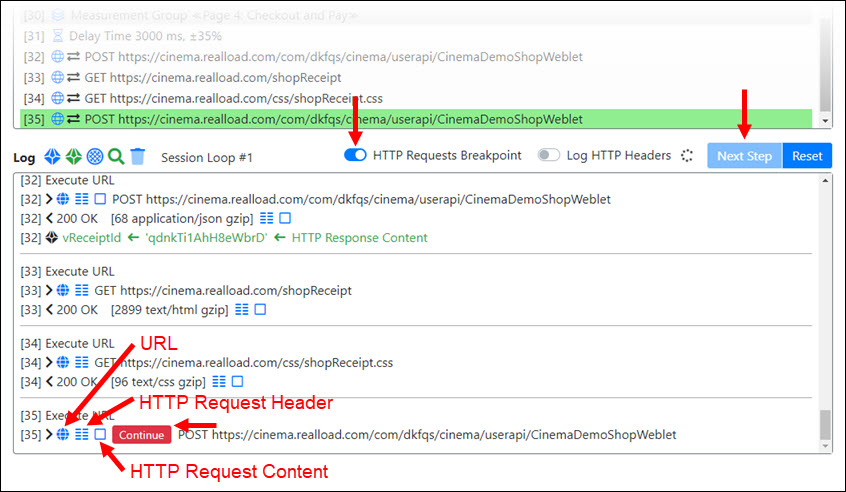
This example assigns the value of a variable to a JSON HTTP request content:
